Download de presentatie
De presentatie wordt gedownload. Even geduld aub

1
Hoofdstuk 14: Graphical User Interface Componenten: Deel 2

2
2 1 Inleiding Gevorderde GUI componenten Tekst gebieden Sliders Menu’s Multiple Document Interface (MDI) Gevorderde layoutmanagers BoxLayout GridBagLayout
 Gevorderde layoutmanagers BoxLayout GridBagLayout")
3
3 2 JTextArea JTextArea Gebied voor het bewerken van diverse tekstlijnen Erft van JTextComponent

4
4 VB: Geselecteerde tekst uit een tekstgebied kopiëren naar een ander tekstgebied

5
1 // Fig. 14.1: TextAreaDemo.java 2 // Copying selected text from one textarea to another. 3 import java.awt.*; 4 import java.awt.event.*; 5 import javax.swing.*; 6 7 public class TextAreaDemo extends JFrame { 8 private JTextArea textArea1, textArea2; 9 private JButton copyButton; 10 11 // set up GUI 12 public TextAreaDemo() 13 { 14 super( "TextArea Demo" ); 15 16 Box box = Box.createHorizontalBox(); 17 18 String string = "This is a demo string to\n" + 19 "illustrate copying text\nfrom one textarea to \n" + 20 "another textarea using an\nexternal event\n"; 21 22 // set up textArea1 23 textArea1 = new JTextArea( string, 10, 15 ); 24 box.add( new JScrollPane( textArea1 ) ); 25 Maak een Box container voor het schikken van GUI componenten Plaats een string in de JTextArea en voeg deze dan toe aan box
 13 { 14 super( TextArea Demo ); Box box = Box.createHorizontalBox(); String string = This is a demo string to\n + 19 illustrate copying text\nfrom one textarea to \n + 20 another textarea using an\nexternal event\n ; // set up textArea1 23 textArea1 = new JTextArea( string, 10, 15 ); 24 box.add( new JScrollPane( textArea1 ) ); 25 Maak een Box container voor het schikken van GUI componenten Plaats een string in de JTextArea en voeg deze dan toe aan box.")
6
26 // set up copyButton 27 copyButton = new JButton( "Copy >>>" ); 28 box.add( copyButton ); 29 copyButton.addActionListener( 30 31 new ActionListener() { // anonymous inner class 32 33 // set text in textArea2 to selected text from textArea1 34 public void actionPerformed( ActionEvent event ) 35 { 36 textArea2.setText( textArea1.getSelectedText() ); 37 } 38 39 } // end anonymous inner class 40 41 ); // end call to addActionListener 42 43 // set up textArea2 44 textArea2 = new JTextArea( 10, 15 ); 45 textArea2.setEditable( false ); 46 box.add( new JScrollPane( textArea2 ) ); 47 48 // add box to content pane 49 Container container = getContentPane(); 50 container.add( box ); // place in BorderLayout.CENTER 51 Wanneer de gebruiker de copyButton indrukt, wordt de geselecteerde tekst uit textArea1 gekopieerd naar textArea2 Maak een JTextArea die niet kan bewerkt worden
; 28 box.add( copyButton ); 29 copyButton.addActionListener( new ActionListener() { // anonymous inner class // set text in textArea2 to selected text from textArea1 34 public void actionPerformed( ActionEvent event ) 35 { 36 textArea2.setText( textArea1.getSelectedText() ); 37 } } // end anonymous inner class ); // end call to addActionListener // set up textArea2 44 textArea2 = new JTextArea( 10, 15 ); 45 textArea2.setEditable( false ); 46 box.add( new JScrollPane( textArea2 ) ); // add box to content pane 49 Container container = getContentPane(); 50 container.add( box ); // place in BorderLayout.CENTER 51 Wanneer de gebruiker de copyButton indrukt, wordt de geselecteerde tekst uit textArea1 gekopieerd naar textArea2 Maak een JTextArea die niet kan bewerkt worden")
7
52 setSize( 425, 200 ); 53 setVisible( true ); 54 55 } // end constructor TextAreaDemo 56 57 public static void main( String args[] ) 58 { 59 TextAreaDemo application = new TextAreaDemo(); 60 application.setDefaultCloseOperation( JFrame.EXIT_ON_CLOSE ); 61 } 62 63 } // end class TextAreaDemo
![52 setSize( 425, 200 ); 53 setVisible( true ); } // end constructor TextAreaDemo public static void main( String args[] ) 58 { 59 TextAreaDemo application = new TextAreaDemo(); 60 application.setDefaultCloseOperation( JFrame.EXIT_ON_CLOSE ); 61 } } // end class TextAreaDemo](http://images.slideplayer.nl/9/2234003/slides/slide_7.jpg "52 setSize( 425, 200 ); 53 setVisible( true ); } // end constructor TextAreaDemo public static void main( String args[] ) 58 { 59 TextAreaDemo application = new TextAreaDemo(); 60 application.setDefaultCloseOperation( JFrame.EXIT_ON_CLOSE ); 61 } } // end class TextAreaDemo")
8
8 3Het maken van een aange- paste subklasse van JPanel “extends” JPanel om nieuwe componenten te maken Een specifiek en toepassingsgericht tekengebied Methode paintComponent van de klasse JComponent

9
9 VB: Het bouwen van een subklasse van JPanel aangepast aan de gebruiker

10
1 // Fig. 14.2: CustomPanel.java 2 // A customized JPanel class. 3 import java.awt.*; 4 import javax.swing.*; 5 6 public class CustomPanel extends JPanel { 7 public final static int CIRCLE = 1, SQUARE = 2; 8 private int shape; 9 10 // use shape to draw an oval or rectangle 11 public void paintComponent( Graphics g ) 12 { 13 super.paintComponent( g ); 14 15 if ( shape == CIRCLE ) 16 g.fillOval( 50, 10, 60, 60 ); 17 else if ( shape == SQUARE ) 18 g.fillRect( 50, 10, 60, 60 ); 19 } 20 21 // set shape value and repaint CustomPanel 22 public void draw( int shapeToDraw ) 23 { 24 shape = shapeToDraw; 25 repaint(); 26 } 27 28 } // end class CustomPanel Shape stelt de te tekenen vorm voor via een geheel getal Overschrijf de methode paintComponent van class JComponent om een ovaal of een rechthoek te tekenen De methode repaint roept de methode paintComponent aan
 12 { 13 super.paintComponent( g ); if ( shape == CIRCLE ) 16 g.fillOval( 50, 10, 60, 60 ); 17 else if ( shape == SQUARE ) 18 g.fillRect( 50, 10, 60, 60 ); 19 } // set shape value and repaint CustomPanel 22 public void draw( int shapeToDraw ) 23 { 24 shape = shapeToDraw; 25 repaint(); 26 } } // end class CustomPanel Shape stelt de te tekenen vorm voor via een geheel getal Overschrijf de methode paintComponent van class JComponent om een ovaal of een rechthoek te tekenen De methode repaint roept de methode paintComponent aan.")
11
11 VB: Het gebruik van een subklasse van JPanel

12
1 // Fig. 14.3: CustomPanelTest.java 2 // Using a customized Panel object. 3 import java.awt.*; 4 import java.awt.event.*; 5 import javax.swing.*; 6 7 public class CustomPanelTest extends JFrame { 8 private JPanel buttonPanel; 9 private CustomPanel myPanel; 10 private JButton circleButton, squareButton; 11 12 // set up GUI 13 public CustomPanelTest() 14 { 15 super( "CustomPanel Test" ); 16 17 // create custom drawing area 18 myPanel = new CustomPanel(); 19 myPanel.setBackground( Color.GREEN ); 20 21 // set up squareButton 22 squareButton = new JButton( "Square" ); 23 squareButton.addActionListener( 24 Maak een CustomPanel object en zet de achtergrond op groen
 14 { 15 super( CustomPanel Test ); // create custom drawing area 18 myPanel = new CustomPanel(); 19 myPanel.setBackground( Color.GREEN ); // set up squareButton 22 squareButton = new JButton( Square ); 23 squareButton.addActionListener( 24 Maak een CustomPanel object en zet de achtergrond op groen.")
13
25 new ActionListener() { // anonymous inner class 26 27 // draw a square 28 public void actionPerformed( ActionEvent event ) 29 { 30 myPanel.draw( CustomPanel.SQUARE ); 31 } 32 33 } // end anonymous inner class 34 35 ); // end call to addActionListener 36 37 circleButton = new JButton( "Circle" ); 38 circleButton.addActionListener( 39 40 new ActionListener() { // anonymous inner class 41 42 // draw a circle 43 public void actionPerformed( ActionEvent event ) 44 { 45 myPanel.draw( CustomPanel.CIRCLE ); 46 } 47 48 } // end anonymous inner class 49 50 ); // end call to addActionListener 51 Wanneer de gebruiker squareButton indrukt, wordt een vierkant op CustomPanel getekend Wanneer de gebruiker circleButton indrukt, wordt een cirkel op CustomPanel getekend
 { // anonymous inner class // draw a square 28 public void actionPerformed( ActionEvent event ) 29 { 30 myPanel.draw( CustomPanel.SQUARE ); 31 } } // end anonymous inner class ); // end call to addActionListener circleButton = new JButton( Circle ); 38 circleButton.addActionListener( new ActionListener() { // anonymous inner class // draw a circle 43 public void actionPerformed( ActionEvent event ) 44 { 45 myPanel.draw( CustomPanel.CIRCLE ); 46 } } // end anonymous inner class ); // end call to addActionListener 51 Wanneer de gebruiker squareButton indrukt, wordt een vierkant op CustomPanel getekend Wanneer de gebruiker circleButton indrukt, wordt een cirkel op CustomPanel getekend")
14
52 // set up panel containing buttons 53 buttonPanel = new JPanel(); 54 buttonPanel.setLayout( new GridLayout( 1, 2 ) ); 55 buttonPanel.add( circleButton ); 56 buttonPanel.add( squareButton ); 57 58 // attach button panel & custom drawing area to content pane 59 Container container = getContentPane(); 60 container.add( myPanel, BorderLayout.CENTER ); 61 container.add( buttonPanel, BorderLayout.SOUTH ); 62 63 setSize( 300, 150 ); 64 setVisible( true ); 65 66 } // end constructor CustomPanelTest 67 68 public static void main( String args[] ) 69 { 70 CustomPanelTest application = new CustomPanelTest(); 71 application.setDefaultCloseOperation( JFrame.EXIT_ON_CLOSE ); 72 } 73 74 } // end class CustomPanelTest Gebruik GridLayout om buttons te organiseren
![52 // set up panel containing buttons 53 buttonPanel = new JPanel(); 54 buttonPanel.setLayout( new GridLayout( 1, 2 ) ); 55 buttonPanel.add( circleButton ); 56 buttonPanel.add( squareButton ); // attach button panel & custom drawing area to content pane 59 Container container = getContentPane(); 60 container.add( myPanel, BorderLayout.CENTER ); 61 container.add( buttonPanel, BorderLayout.SOUTH ); setSize( 300, 150 ); 64 setVisible( true ); } // end constructor CustomPanelTest public static void main( String args[] ) 69 { 70 CustomPanelTest application = new CustomPanelTest(); 71 application.setDefaultCloseOperation( JFrame.EXIT_ON_CLOSE ); 72 } } // end class CustomPanelTest Gebruik GridLayout om buttons te organiseren](http://images.slideplayer.nl/9/2234003/slides/slide_14.jpg "52 // set up panel containing buttons 53 buttonPanel = new JPanel(); 54 buttonPanel.setLayout( new GridLayout( 1, 2 ) ); 55 buttonPanel.add( circleButton ); 56 buttonPanel.add( squareButton ); // attach button panel & custom drawing area to content pane 59 Container container = getContentPane(); 60 container.add( myPanel, BorderLayout.CENTER ); 61 container.add( buttonPanel, BorderLayout.SOUTH ); setSize( 300, 150 ); 64 setVisible( true ); } // end constructor CustomPanelTest public static void main( String args[] ) 69 { 70 CustomPanelTest application = new CustomPanelTest(); 71 application.setDefaultCloseOperation( JFrame.EXIT_ON_CLOSE ); 72 } } // end class CustomPanelTest Gebruik GridLayout om buttons te organiseren")
15
15 4 Het maken van een Self- Contained Subclass van JPanel JPanel Ondersteunt geen conventionele events Events met betrekking tot knoppen, tekstgebieden, enz. In staat om lower-level events te herkennen mouse events, key events, enz. Self-contained panel Luistert naar zijn eigen mouse events

16
16 VB Een self-contained JPanel klasse dat zijn eigen mouse events afhandelt

17
1 // Fig. 14.4: SelfContainedPanel.java 2 // A self-contained JPanel class that handles its own mouse events. 3 package com.deitel.jhtp5.ch14; 4 5 import java.awt.*; 6 import java.awt.event.*; 7 import javax.swing.*; 8 9 public class SelfContainedPanel extends JPanel { 10 private int x1, y1, x2, y2; 11 12 // set up mouse event handling for SelfContainedPanel 13 public SelfContainedPanel() 14 { 15 // set up mouse listener 16 addMouseListener( 17 18 new MouseAdapter() { // anonymous inner class 19 20 // handle mouse press event 21 public void mousePressed( MouseEvent event ) 22 { 23 x1 = event.getX(); 24 y1 = event.getY(); 25 } 26 Self-contained JPanel luistert naar MouseEvents Bewaar coördinaten van de plaats waar de gebruiker de muisknop indrukt
 14 { 15 // set up mouse listener 16 addMouseListener( new MouseAdapter() { // anonymous inner class // handle mouse press event 21 public void mousePressed( MouseEvent event ) 22 { 23 x1 = event.getX(); 24 y1 = event.getY(); 25 } 26 Self-contained JPanel luistert naar MouseEvents Bewaar coördinaten van de plaats waar de gebruiker de muisknop indrukt.")
18
27 // handle mouse release event 28 public void mouseReleased( MouseEvent event ) 29 { 30 x2 = event.getX(); 31 y2 = event.getY(); 32 repaint(); 33 } 34 35 } // end anonymous inner class 36 37 ); // end call to addMouseListener 38 39 // set up mouse motion listener 40 addMouseMotionListener( 41 42 new MouseMotionAdapter() { // anonymous inner class 43 44 // handle mouse drag event 45 public void mouseDragged( MouseEvent event ) 46 { 47 x2 = event.getX(); 48 y2 = event.getY(); 49 repaint(); 50 } 51 Bewaar coördinaten van de plaats waar de gebruiker de muistoets losliet en dan repaint Self-contained JPanel luistert naar de muisbewegingen Bewaar coördinaten van de plaats waar de gebruiker de muis versleepte dan repaint
 29 { 30 x2 = event.getX(); 31 y2 = event.getY(); 32 repaint(); 33 } } // end anonymous inner class ); // end call to addMouseListener // set up mouse motion listener 40 addMouseMotionListener( new MouseMotionAdapter() { // anonymous inner class // handle mouse drag event 45 public void mouseDragged( MouseEvent event ) 46 { 47 x2 = event.getX(); 48 y2 = event.getY(); 49 repaint(); 50 } 51 Bewaar coördinaten van de plaats waar de gebruiker de muistoets losliet en dan repaint Self-contained JPanel luistert naar de muisbewegingen Bewaar coördinaten van de plaats waar de gebruiker de muis versleepte dan repaint")
19
52 } // end anonymous inner class 53 54 ); // end call to addMouseMotionListener 55 56 } // end constructor SelfContainedPanel 57 58 // return preferred width and height of SelfContainedPanel 59 public Dimension getPreferredSize() 60 { 61 return new Dimension( 150, 100 ); 62 } 63 64 // paint an oval at the specified coordinates 65 public void paintComponent( Graphics g ) 66 { 67 super.paintComponent( g ); 68 69 g.drawOval( Math.min( x1, x2 ), Math.min( y1, y2 ), 70 Math.abs( x1 - x2 ), Math.abs( y1 - y2 ) ); 71 } 72 73 } // end class SelfContainedPanel Teken ovaal
; // end call to addMouseMotionListener } // end constructor SelfContainedPanel // return preferred width and height of SelfContainedPanel 59 public Dimension getPreferredSize() 60 { 61 return new Dimension( 150, 100 ); 62 } // paint an oval at the specified coordinates 65 public void paintComponent( Graphics g ) 66 { 67 super.paintComponent( g ); g.drawOval( Math.min( x1, x2 ), Math.min( y1, y2 ), 70 Math.abs( x1 - x2 ), Math.abs( y1 - y2 ) ); 71 } } // end class SelfContainedPanel Teken ovaal")
20
20 VB: Het maken van een self-contained subclass van JPanel dat zijn eigen mouse events voortbrengt

21
1 // Fig. 14.5: SelfContainedPanelTest.java 2 // Creating a self-contained subclass of JPanel that processes 3 // its own mouse events. 4 import java.awt.*; 5 import java.awt.event.*; 6 import javax.swing.*; 7 8 import com.deitel.jhtp5.ch14.SelfContainedPanel; 9 10 public class SelfContainedPanelTest extends JFrame { 11 private SelfContainedPanel myPanel; 12 13 // set up GUI and mouse motion event handlers for application window 14 public SelfContainedPanelTest() 15 { 16 // set up a SelfContainedPanel 17 myPanel = new SelfContainedPanel(); 18 myPanel.setBackground( Color.YELLOW ); 19 20 Container container = getContentPane(); 21 container.setLayout( new FlowLayout() ); 22 container.add( myPanel ); 23 Maak SelfCustomPanel object en zet achtergrond op geel
 15 { 16 // set up a SelfContainedPanel 17 myPanel = new SelfContainedPanel(); 18 myPanel.setBackground( Color.YELLOW ); Container container = getContentPane(); 21 container.setLayout( new FlowLayout() ); 22 container.add( myPanel ); 23 Maak SelfCustomPanel object en zet achtergrond op geel.")
22
24 // set up mouse motion event handling 25 addMouseMotionListener( 26 27 new MouseMotionListener() { // anonymous inner class 28 29 // handle mouse drag event 30 public void mouseDragged( MouseEvent event ) 31 { 32 setTitle( "Dragging: x=" + event.getX() + 33 "; y=" + event.getY() ); 34 } 35 36 // handle mouse move event 37 public void mouseMoved( MouseEvent event ) 38 { 39 setTitle( "Moving: x=" + event.getX() + 40 "; y=" + event.getY() ); 41 } 42 43 } // end anonymous inner class 44 45 ); // end call to addMouseMotionListener 46 47 setSize( 300, 200 ); 48 setVisible( true ); 49 50 } // end constructor SelfContainedPanelTest Registreer een anoniem inner-class object voor het behandelen van de events van de muisbewegingen Toont een String in de title bar met de x-y coördinaat waar een event van de muisbeweging plaatsvond
 { // anonymous inner class // handle mouse drag event 30 public void mouseDragged( MouseEvent event ) 31 { 32 setTitle( Dragging: x= + event.getX() + 33 ; y= + event.getY() ); 34 } // handle mouse move event 37 public void mouseMoved( MouseEvent event ) 38 { 39 setTitle( Moving: x= + event.getX() + 40 ; y= + event.getY() ); 41 } } // end anonymous inner class ); // end call to addMouseMotionListener setSize( 300, 200 ); 48 setVisible( true ); } // end constructor SelfContainedPanelTest Registreer een anoniem inner-class object voor het behandelen van de events van de muisbewegingen Toont een String in de title bar met de x-y coördinaat waar een event van de muisbeweging plaatsvond")
23
51 52 public static void main( String args[] ) 53 { 54 SelfContainedPanelTest application = new SelfContainedPanelTest(); 55 application.setDefaultCloseOperation( JFrame.EXIT_ON_CLOSE ); 56 } 57 58 } // end class SelfContainedPanelTest
![51 52 public static void main( String args[] ) 53 { 54 SelfContainedPanelTest application = new SelfContainedPanelTest(); 55 application.setDefaultCloseOperation( JFrame.EXIT_ON_CLOSE ); 56 } } // end class SelfContainedPanelTest](http://images.slideplayer.nl/9/2234003/slides/slide_23.jpg "51 52 public static void main( String args[] ) 53 { 54 SelfContainedPanelTest application = new SelfContainedPanelTest(); 55 application.setDefaultCloseOperation( JFrame.EXIT_ON_CLOSE ); 56 } } // end class SelfContainedPanelTest")
24
24 5 JSlider JSlider Stelt de gebruikers in staat om te selecteren uit een interval van gehele getallen Kenmerken: Tick marks (groot en klein) Snap-to ticks Orientation (horizontaal en verticaal)
 Snap-to ticks Orientation (horizontaal en verticaal)")
25
25 Horizontaal JSlider component thumb tick mark

26
26 VB: Een aangepaste JPanel klasse

27
1 // Fig. 14.7: OvalPanel.java 2 // A customized JPanel class. 3 import java.awt.*; 4 import javax.swing.*; 5 6 public class OvalPanel extends JPanel { 7 private int diameter = 10; 8 9 // draw an oval of the specified diameter 10 public void paintComponent( Graphics g ) 11 { 12 super.paintComponent( g ); 13 14 g.fillOval( 10, 10, diameter, diameter ); 15 } 16 17 // validate and set diameter, then repaint 18 public void setDiameter( int newDiameter ) 19 { 20 // if diameter invalid, default to 10 21 diameter = ( newDiameter >= 0 ? newDiameter : 10 ); 22 repaint(); 23 } 24 Tekent een gevulde ovaal met een gegeven diameter Stel diameter in en repaint
 11 { 12 super.paintComponent( g ); g.fillOval( 10, 10, diameter, diameter ); 15 } // validate and set diameter, then repaint 18 public void setDiameter( int newDiameter ) 19 { 20 // if diameter invalid, default to diameter = ( newDiameter >= 0 . newDiameter : 10 ); 22 repaint(); 23 } 24 Tekent een gevulde ovaal met een gegeven diameter Stel diameter in en repaint.")
28
25 // used by layout manager to determine preferred size 26 public Dimension getPreferredSize() 27 { 28 return new Dimension( 200, 200 ); 29 } 30 31 // used by layout manager to determine minimum size 32 public Dimension getMinimumSize() 33 { 34 return getPreferredSize(); 35 } 36 37 } // end class OvalPanel
 27 { 28 return new Dimension( 200, 200 ); 29 } // used by layout manager to determine minimum size 32 public Dimension getMinimumSize() 33 { 34 return getPreferredSize(); 35 } } // end class OvalPanel")
29
29 Voorbeeld Gebruiken JSlider om de afmetingen van een cirkel/ovaal te wijzigen

30
1 // Fig. 14.8: SliderDemo.java 2 // Using JSliders to size an oval. 3 import java.awt.*; 4 import java.awt.event.*; 5 import javax.swing.*; 6 import javax.swing.event.*; 7 8 public class SliderDemo extends JFrame { 9 private JSlider diameterSlider; 10 private OvalPanel myPanel; 11 12 // set up GUI 13 public SliderDemo() 14 { 15 super( "Slider Demo" ); 16 17 // set up OvalPanel 18 myPanel = new OvalPanel(); 19 myPanel.setBackground( Color.YELLOW ); 20 21 // set up JSlider to control diameter value 22 diameterSlider = 23 new JSlider( SwingConstants.HORIZONTAL, 0, 200, 10 ); 24 diameterSlider.setMajorTickSpacing( 10 ); 25 diameterSlider.setPaintTicks( true ); 26 Maak OvalPanel object en zet achtergrond op geel Maak horizontaal JSlider object met een minimum waarde van 0, maximum waarde van 200 en de thumb op positie 10
 14 { 15 super( Slider Demo ); // set up OvalPanel 18 myPanel = new OvalPanel(); 19 myPanel.setBackground( Color.YELLOW ); // set up JSlider to control diameter value 22 diameterSlider = 23 new JSlider( SwingConstants.HORIZONTAL, 0, 200, 10 ); 24 diameterSlider.setMajorTickSpacing( 10 ); 25 diameterSlider.setPaintTicks( true ); 26 Maak OvalPanel object en zet achtergrond op geel Maak horizontaal JSlider object met een minimum waarde van 0, maximum waarde van 200 en de thumb op positie 10.")
31
27 // register JSlider event listener 28 diameterSlider.addChangeListener( 29 30 new ChangeListener() { // anonymous inner class 31 32 // handle change in slider value 33 public void stateChanged( ChangeEvent e ) 34 { 35 myPanel.setDiameter( diameterSlider.getValue() ); 36 } 37 38 } // end anonymous inner class 39 40 ); // end call to addChangeListener 41 42 // attach components to content pane 43 Container container = getContentPane(); 44 container.add( diameterSlider, BorderLayout.SOUTH ); 45 container.add( myPanel, BorderLayout.CENTER ); 46 47 setSize( 220, 270 ); 48 setVisible( true ); 49 50 } // end constructor SliderDemo 51 Registreer een anoniem ChangeListener object om de events van JSlider te behandelen Wanneer gebruiker een andere waarde aanduidt in JSlider, wordt de diameter van OvalPanel aangepast
 { // anonymous inner class // handle change in slider value 33 public void stateChanged( ChangeEvent e ) 34 { 35 myPanel.setDiameter( diameterSlider.getValue() ); 36 } } // end anonymous inner class ); // end call to addChangeListener // attach components to content pane 43 Container container = getContentPane(); 44 container.add( diameterSlider, BorderLayout.SOUTH ); 45 container.add( myPanel, BorderLayout.CENTER ); setSize( 220, 270 ); 48 setVisible( true ); } // end constructor SliderDemo 51 Registreer een anoniem ChangeListener object om de events van JSlider te behandelen Wanneer gebruiker een andere waarde aanduidt in JSlider, wordt de diameter van OvalPanel aangepast")
32
52 public static void main( String args[] ) 53 { 54 SliderDemo application = new SliderDemo(); 55 application.setDefaultCloseOperation( JFrame.EXIT_ON_CLOSE ); 56 } 57 58 } // end class SliderDemo
![52 public static void main( String args[] ) 53 { 54 SliderDemo application = new SliderDemo(); 55 application.setDefaultCloseOperation( JFrame.EXIT_ON_CLOSE ); 56 } } // end class SliderDemo](http://images.slideplayer.nl/9/2234003/slides/slide_32.jpg "52 public static void main( String args[] ) 53 { 54 SliderDemo application = new SliderDemo(); 55 application.setDefaultCloseOperation( JFrame.EXIT_ON_CLOSE ); 56 } } // end class SliderDemo")
33
33 6 Windows JFrame Vensters met title bar en border Subclass van java.awt.Frame Subclass van java.awt.Window “Heavyweight” componenten De handelingen wanneer de gebruiker het venster sluit: DISPOSE_ON_CLOSE DO_NOTHING_ON_CLOSE HIDE_ON_CLOSE

34
34 7 Gebruik van menu’s met Frames Menu’s Staat toe om acties uit te voeren met het centraliseren van GUI Beheerst door menu bar JMenuBar Opgebouwd uit menu componenten JMenuItem

35
35 VB: Een applicatie die het gebruik van verschillende menu items en speciale karakters illustreert

36
1 // Fig. 14.9: MenuTest.java 2 // Demonstrating menus 3 import java.awt.*; 4 import java.awt.event.*; 5 import javax.swing.*; 6 7 public class MenuTest extends JFrame { 8 private final Color colorValues[] = 9 { Color.BLACK, Color.BLUE, Color.RED, Color.GREEN }; 10 private JRadioButtonMenuItem colorItems[], fonts[]; 11 private JCheckBoxMenuItem styleItems[]; 12 private JLabel displayLabel; 13 private ButtonGroup fontGroup, colorGroup; 14 private int style; 15 16 // set up GUI 17 public MenuTest() 18 { 19 super( "Using JMenus" ); 20 21 // set up File menu and its menu items 22 JMenu fileMenu = new JMenu( "File" ); 23 fileMenu.setMnemonic( 'F' ); 24 maak een File JMenu
 18 { 19 super( Using JMenus ); // set up File menu and its menu items 22 JMenu fileMenu = new JMenu( File ); 23 fileMenu.setMnemonic( F ); 24 maak een File JMenu.")
37
25 // set up About... menu item 26 JMenuItem aboutItem = new JMenuItem( "About..." ); 27 aboutItem.setMnemonic( 'A' ); 28 fileMenu.add( aboutItem ); 29 aboutItem.addActionListener( 30 31 new ActionListener() { // anonymous inner class 32 33 // display message dialog when user selects About... 34 public void actionPerformed( ActionEvent event ) 35 { 36 JOptionPane.showMessageDialog( MenuTest.this, 37 "This is an example\nof using menus", 38 "About", JOptionPane.PLAIN_MESSAGE ); 39 } 40 41 } // end anonymous inner class 42 43 ); // end call to addActionListener 44 45 // set up Exit menu item 46 JMenuItem exitItem = new JMenuItem( "Exit" ); 47 exitItem.setMnemonic( 'x' ); 48 fileMenu.add( exitItem ); 49 exitItem.addActionListener( 50 maak About… JMenuItem om in fileMenu geplaatst te worden Wanneer gebruiker About… JMenuItem selecteert, toon dan de message dialog met de geschikte tekst maak Exit JMenuItem die moet geplaatst worden in fileMenu
; 27 aboutItem.setMnemonic( A ); 28 fileMenu.add( aboutItem ); 29 aboutItem.addActionListener( new ActionListener() { // anonymous inner class // display message dialog when user selects About public void actionPerformed( ActionEvent event ) 35 { 36 JOptionPane.showMessageDialog( MenuTest.this, 37 This is an example\nof using menus , 38 About , JOptionPane.PLAIN_MESSAGE ); 39 } } // end anonymous inner class ); // end call to addActionListener // set up Exit menu item 46 JMenuItem exitItem = new JMenuItem( Exit ); 47 exitItem.setMnemonic( x ); 48 fileMenu.add( exitItem ); 49 exitItem.addActionListener( 50 maak About… JMenuItem om in fileMenu geplaatst te worden Wanneer gebruiker About… JMenuItem selecteert, toon dan de message dialog met de geschikte tekst maak Exit JMenuItem die moet geplaatst worden in fileMenu.")
38
51 new ActionListener() { // anonymous inner class 52 53 // terminate application when user clicks exitItem 54 public void actionPerformed( ActionEvent event ) 55 { 56 System.exit( 0 ); 57 } 58 59 } // end anonymous inner class 60 61 ); // end call to addActionListener 62 63 // create menu bar and attach it to MenuTest window 64 JMenuBar bar = new JMenuBar(); 65 setJMenuBar( bar ); 66 bar.add( fileMenu ); 67 68 // create Format menu, its submenus and menu items 69 JMenu formatMenu = new JMenu( "Format" ); 70 formatMenu.setMnemonic( 'r' ); 71 72 // create Color submenu 73 String colors[] = { "Black", "Blue", "Red", "Green" }; 74 Wanneer gebruiker Exit JMenuItem selecteert, verlaten we het systeem maak JMenuBar om JMenus te bevatten maak Format JMenu
![51 new ActionListener() { // anonymous inner class // terminate application when user clicks exitItem 54 public void actionPerformed( ActionEvent event ) 55 { 56 System.exit( 0 ); 57 } } // end anonymous inner class ); // end call to addActionListener // create menu bar and attach it to MenuTest window 64 JMenuBar bar = new JMenuBar(); 65 setJMenuBar( bar ); 66 bar.add( fileMenu ); // create Format menu, its submenus and menu items 69 JMenu formatMenu = new JMenu( Format ); 70 formatMenu.setMnemonic( r ); // create Color submenu 73 String colors[] = { Black , Blue , Red , Green }; 74 Wanneer gebruiker Exit JMenuItem selecteert, verlaten we het systeem maak JMenuBar om JMenus te bevatten maak Format JMenu](http://images.slideplayer.nl/9/2234003/slides/slide_38.jpg "51 new ActionListener() { // anonymous inner class // terminate application when user clicks exitItem 54 public void actionPerformed( ActionEvent event ) 55 { 56 System.exit( 0 ); 57 } } // end anonymous inner class ); // end call to addActionListener // create menu bar and attach it to MenuTest window 64 JMenuBar bar = new JMenuBar(); 65 setJMenuBar( bar ); 66 bar.add( fileMenu ); // create Format menu, its submenus and menu items 69 JMenu formatMenu = new JMenu( Format ); 70 formatMenu.setMnemonic( r ); // create Color submenu 73 String colors[] = { Black , Blue , Red , Green }; 74 Wanneer gebruiker Exit JMenuItem selecteert, verlaten we het systeem maak JMenuBar om JMenus te bevatten maak Format JMenu")
39
75 JMenu colorMenu = new JMenu( "Color" ); 76 colorMenu.setMnemonic( 'C' ); 77 78 colorItems = new JRadioButtonMenuItem[ colors.length ]; 79 colorGroup = new ButtonGroup(); 80 ItemHandler itemHandler = new ItemHandler(); 81 82 // create color radio button menu items 83 for ( int count = 0; count < colors.length; count++ ) { 84 colorItems[ count ] = 85 new JRadioButtonMenuItem( colors[ count ] ); 86 colorMenu.add( colorItems[ count ] ); 87 colorGroup.add( colorItems[ count ] ); 88 colorItems[ count ].addActionListener( itemHandler ); 89 } 90 91 // select first Color menu item 92 colorItems[ 0 ].setSelected( true ); 93 94 // add format menu to menu bar 95 formatMenu.add( colorMenu ); 96 formatMenu.addSeparator(); 97 98 // create Font submenu 99 String fontNames[] = { "Serif", "Monospaced", "SansSerif" }; 100 maak Color JMenu (submenu van Format JMenu) maak JRadioButtonMenuItems voor Color JMenu en zorg ervoor dat één menu item tegelijkertijd wordt geselecteerd. Separator plaatst lijn tussen JMenuItems
![75 JMenu colorMenu = new JMenu( Color ); 76 colorMenu.setMnemonic( C ); colorItems = new JRadioButtonMenuItem[ colors.length ]; 79 colorGroup = new ButtonGroup(); 80 ItemHandler itemHandler = new ItemHandler(); // create color radio button menu items 83 for ( int count = 0; count < colors.length; count++ ) { 84 colorItems[ count ] = 85 new JRadioButtonMenuItem( colors[ count ] ); 86 colorMenu.add( colorItems[ count ] ); 87 colorGroup.add( colorItems[ count ] ); 88 colorItems[ count ].addActionListener( itemHandler ); 89 } // select first Color menu item 92 colorItems[ 0 ].setSelected( true ); // add format menu to menu bar 95 formatMenu.add( colorMenu ); 96 formatMenu.addSeparator(); // create Font submenu 99 String fontNames[] = { Serif , Monospaced , SansSerif }; 100 maak Color JMenu (submenu van Format JMenu) maak JRadioButtonMenuItems voor Color JMenu en zorg ervoor dat één menu item tegelijkertijd wordt geselecteerd.](http://images.slideplayer.nl/9/2234003/slides/slide_39.jpg "Separator plaatst lijn tussen JMenuItems.")
40
101 JMenu fontMenu = new JMenu( "Font" ); 102 fontMenu.setMnemonic( 'n' ); 103 104 fonts = new JRadioButtonMenuItem[ fontNames.length ]; 105 fontGroup = new ButtonGroup(); 106 107 // create Font radio button menu items 108 for ( int count = 0; count < fonts.length; count++ ) { 109 fonts[ count ] = new JRadioButtonMenuItem( fontNames[ count ] ); 110 fontMenu.add( fonts[ count ] ); 111 fontGroup.add( fonts[ count ] ); 112 fonts[ count ].addActionListener( itemHandler ); 113 } 114 115 // select first Font menu item 116 fonts[ 0 ].setSelected( true ); 117 118 fontMenu.addSeparator(); 119 120 // set up style menu items 121 String styleNames[] = { "Bold", "Italic" }; 122 123 styleItems = new JCheckBoxMenuItem[ styleNames.length ]; 124 StyleHandler styleHandler = new StyleHandler(); 125 maak Font JMenu (submenu van Format JMenu) maak JRadioButtonMenuItems voor Font JMenu en zorg ervoor dat één menu item tegelijkertijd wordt geselecteerd
![101 JMenu fontMenu = new JMenu( Font ); 102 fontMenu.setMnemonic( n ); fonts = new JRadioButtonMenuItem[ fontNames.length ]; 105 fontGroup = new ButtonGroup(); // create Font radio button menu items 108 for ( int count = 0; count < fonts.length; count++ ) { 109 fonts[ count ] = new JRadioButtonMenuItem( fontNames[ count ] ); 110 fontMenu.add( fonts[ count ] ); 111 fontGroup.add( fonts[ count ] ); 112 fonts[ count ].addActionListener( itemHandler ); 113 } // select first Font menu item 116 fonts[ 0 ].setSelected( true ); fontMenu.addSeparator(); // set up style menu items 121 String styleNames[] = { Bold , Italic }; styleItems = new JCheckBoxMenuItem[ styleNames.length ]; 124 StyleHandler styleHandler = new StyleHandler(); 125 maak Font JMenu (submenu van Format JMenu) maak JRadioButtonMenuItems voor Font JMenu en zorg ervoor dat één menu item tegelijkertijd wordt geselecteerd](http://images.slideplayer.nl/9/2234003/slides/slide_40.jpg "101 JMenu fontMenu = new JMenu( Font ); 102 fontMenu.setMnemonic( n ); fonts = new JRadioButtonMenuItem[ fontNames.length ]; 105 fontGroup = new ButtonGroup(); // create Font radio button menu items 108 for ( int count = 0; count < fonts.length; count++ ) { 109 fonts[ count ] = new JRadioButtonMenuItem( fontNames[ count ] ); 110 fontMenu.add( fonts[ count ] ); 111 fontGroup.add( fonts[ count ] ); 112 fonts[ count ].addActionListener( itemHandler ); 113 } // select first Font menu item 116 fonts[ 0 ].setSelected( true ); fontMenu.addSeparator(); // set up style menu items 121 String styleNames[] = { Bold , Italic }; styleItems = new JCheckBoxMenuItem[ styleNames.length ]; 124 StyleHandler styleHandler = new StyleHandler(); 125 maak Font JMenu (submenu van Format JMenu) maak JRadioButtonMenuItems voor Font JMenu en zorg ervoor dat één menu item tegelijkertijd wordt geselecteerd")
41
126 // create style checkbox menu items 127 for ( int count = 0; count < styleNames.length; count++ ) { 128 styleItems[ count ] = 129 new JCheckBoxMenuItem( styleNames[ count ] ); 130 fontMenu.add( styleItems[ count ] ); 131 styleItems[ count ].addItemListener( styleHandler ); 132 } 133 134 // put Font menu in Format menu 135 formatMenu.add( fontMenu ); 136 137 // add Format menu to menu bar 138 bar.add( formatMenu ); 139 140 // set up label to display text 141 displayLabel = new JLabel( "Sample Text", SwingConstants.CENTER ); 142 displayLabel.setForeground( colorValues[ 0 ] ); 143 displayLabel.setFont( new Font( "Serif", Font.PLAIN, 72 ) ); 144 145 getContentPane().setBackground( Color.CYAN ); 146 getContentPane().add( displayLabel, BorderLayout.CENTER ); 147 148 setSize( 500, 200 ); 149 setVisible( true ); 150 151 } // end constructor 152
![126 // create style checkbox menu items 127 for ( int count = 0; count < styleNames.length; count++ ) { 128 styleItems[ count ] = 129 new JCheckBoxMenuItem( styleNames[ count ] ); 130 fontMenu.add( styleItems[ count ] ); 131 styleItems[ count ].addItemListener( styleHandler ); 132 } // put Font menu in Format menu 135 formatMenu.add( fontMenu ); // add Format menu to menu bar 138 bar.add( formatMenu ); // set up label to display text 141 displayLabel = new JLabel( Sample Text , SwingConstants.CENTER ); 142 displayLabel.setForeground( colorValues[ 0 ] ); 143 displayLabel.setFont( new Font( Serif , Font.PLAIN, 72 ) ); getContentPane().setBackground( Color.CYAN ); 146 getContentPane().add( displayLabel, BorderLayout.CENTER ); setSize( 500, 200 ); 149 setVisible( true ); } // end constructor 152](http://images.slideplayer.nl/9/2234003/slides/slide_41.jpg "126 // create style checkbox menu items 127 for ( int count = 0; count < styleNames.length; count++ ) { 128 styleItems[ count ] = 129 new JCheckBoxMenuItem( styleNames[ count ] ); 130 fontMenu.add( styleItems[ count ] ); 131 styleItems[ count ].addItemListener( styleHandler ); 132 } // put Font menu in Format menu 135 formatMenu.add( fontMenu ); // add Format menu to menu bar 138 bar.add( formatMenu ); // set up label to display text 141 displayLabel = new JLabel( Sample Text , SwingConstants.CENTER ); 142 displayLabel.setForeground( colorValues[ 0 ] ); 143 displayLabel.setFont( new Font( Serif , Font.PLAIN, 72 ) ); getContentPane().setBackground( Color.CYAN ); 146 getContentPane().add( displayLabel, BorderLayout.CENTER ); setSize( 500, 200 ); 149 setVisible( true ); } // end constructor 152")
42
153 public static void main( String args[] ) 154 { 155 MenuTest application = new MenuTest(); 156 application.setDefaultCloseOperation( JFrame.EXIT_ON_CLOSE ); 157 } 158 159 // inner class to handle action events from menu items 160 private class ItemHandler implements ActionListener { 161 162 // process color and font selections 163 public void actionPerformed( ActionEvent event ) 164 { 165 // process color selection 166 for ( int count = 0; count < colorItems.length; count++ ) 167 168 if ( colorItems[ count ].isSelected() ) { 169 displayLabel.setForeground( colorValues[ count ] ); 170 break; 171 } 172 173 // process font selection 174 for ( int count = 0; count < fonts.length; count++ ) 175 176 if ( event.getSource() == fonts[ count ] ) { 177 displayLabel.setFont( 178 new Font( fonts[ count ].getText(), style, 72 ) ); 179 break; 180 } Opgeroepen wanneer de gebruiker JMenuItem selecteert Bepaal welk fonttype of kleur in het menu de aanleiding van het event is Zet het resp. aangepaste fonttype of kleur van JLabel
![153 public static void main( String args[] ) 154 { 155 MenuTest application = new MenuTest(); 156 application.setDefaultCloseOperation( JFrame.EXIT_ON_CLOSE ); 157 } // inner class to handle action events from menu items 160 private class ItemHandler implements ActionListener { // process color and font selections 163 public void actionPerformed( ActionEvent event ) 164 { 165 // process color selection 166 for ( int count = 0; count < colorItems.length; count++ ) if ( colorItems[ count ].isSelected() ) { 169 displayLabel.setForeground( colorValues[ count ] ); 170 break; 171 } // process font selection 174 for ( int count = 0; count < fonts.length; count++ ) if ( event.getSource() == fonts[ count ] ) { 177 displayLabel.setFont( 178 new Font( fonts[ count ].getText(), style, 72 ) ); 179 break; 180 } Opgeroepen wanneer de gebruiker JMenuItem selecteert Bepaal welk fonttype of kleur in het menu de aanleiding van het event is Zet het resp.](http://images.slideplayer.nl/9/2234003/slides/slide_42.jpg "aangepaste fonttype of kleur van JLabel.")
43
181 182 repaint(); 183 184 } // end method actionPerformed 185 186 } // end class ItemHandler 187 188 // inner class to handle item events from check box menu items 189 private class StyleHandler implements ItemListener { 190 191 // process font style selections 192 public void itemStateChanged( ItemEvent e ) 193 { 194 style = 0; 195 196 // check for bold selection 197 if ( styleItems[ 0 ].isSelected() ) 198 style += Font.BOLD; 199 200 // check for italic selection 201 if ( styleItems[ 1 ].isSelected() ) 202 style += Font.ITALIC; 203 204 displayLabel.setFont( 205 new Font( displayLabel.getFont().getName(), style, 72 ) ); Opgeroepen wanneer de gebruiker JCheckBoxMenuItem selecteert Bepaalt nieuwe stijl van lettertype
![repaint(); } // end method actionPerformed } // end class ItemHandler // inner class to handle item events from check box menu items 189 private class StyleHandler implements ItemListener { // process font style selections 192 public void itemStateChanged( ItemEvent e ) 193 { 194 style = 0; // check for bold selection 197 if ( styleItems[ 0 ].isSelected() ) 198 style += Font.BOLD; // check for italic selection 201 if ( styleItems[ 1 ].isSelected() ) 202 style += Font.ITALIC; displayLabel.setFont( 205 new Font( displayLabel.getFont().getName(), style, 72 ) ); Opgeroepen wanneer de gebruiker JCheckBoxMenuItem selecteert Bepaalt nieuwe stijl van lettertype](http://images.slideplayer.nl/9/2234003/slides/slide_43.jpg "repaint(); } // end method actionPerformed } // end class ItemHandler // inner class to handle item events from check box menu items 189 private class StyleHandler implements ItemListener { // process font style selections 192 public void itemStateChanged( ItemEvent e ) 193 { 194 style = 0; // check for bold selection 197 if ( styleItems[ 0 ].isSelected() ) 198 style += Font.BOLD; // check for italic selection 201 if ( styleItems[ 1 ].isSelected() ) 202 style += Font.ITALIC; displayLabel.setFont( 205 new Font( displayLabel.getFont().getName(), style, 72 ) ); Opgeroepen wanneer de gebruiker JCheckBoxMenuItem selecteert Bepaalt nieuwe stijl van lettertype")
44
206 207 repaint(); 208 } 209 210 } // end class StyleHandler 211 212 } // end class MenuTest
; 208 } } // end class StyleHandler } // end class MenuTest")
45
45 Oefening 1 Schrijf een applicatie met de volgende menu zonder functionaliteit

46
// MenuIcon.java import java.awt.event.*; import javax.swing.*; public class MenuIcon extends JFrame { private JMenuItem nieuwMenuItem, openMenuItem, printMenuItem, sluitMenuItem; public MenuIcon() { super("Menu Demo"); // Create menu bar and set menu bar to the frame JMenuBar bar = new JMenuBar(); setJMenuBar(bar); // Add menu "Bewerking" to menu bar JMenu bestandMenu = new JMenu("Bestand"); bestandMenu.setMnemonic('B'); bar.add(bestandMenu);
 { super( Menu Demo ); // Create menu bar and set menu bar to the frame JMenuBar bar = new JMenuBar(); setJMenuBar(bar); // Add menu Bewerking to menu bar JMenu bestandMenu = new JMenu( Bestand ); bestandMenu.setMnemonic( B ); bar.add(bestandMenu);")
47
// Add menu items with mnemonics to menu "Bestand" bestandMenu.add(nieuwMenuItem= new JMenuItem("Nieuw", 'N')); nieuwMenuItem.setIcon(new ImageIcon("new.gif")); bestandMenu.add(openMenuItem = new JMenuItem("Open", 'O')); openMenuItem.setIcon(new ImageIcon("open.gif")); bestandMenu.add(printMenuItem = new JMenuItem("Print", 'P')); bestandMenu.add(sluitMenuItem = new JMenuItem("Afsluiten", 'A')); setSize(300,300); setVisible(true); } //execute application public static void main(String[] args) { MenuIcon application = new MenuIcon(); application.setDefaultCloseOperation(JFrame.EXIT_ON_CLOSE); }
![// Add menu items with mnemonics to menu Bestand bestandMenu.add(nieuwMenuItem= new JMenuItem( Nieuw , N )); nieuwMenuItem.setIcon(new ImageIcon( new.gif )); bestandMenu.add(openMenuItem = new JMenuItem( Open , O )); openMenuItem.setIcon(new ImageIcon( open.gif )); bestandMenu.add(printMenuItem = new JMenuItem( Print , P )); bestandMenu.add(sluitMenuItem = new JMenuItem( Afsluiten , A )); setSize(300,300); setVisible(true); } //execute application public static void main(String[] args) { MenuIcon application = new MenuIcon(); application.setDefaultCloseOperation(JFrame.EXIT_ON_CLOSE); }](http://images.slideplayer.nl/9/2234003/slides/slide_47.jpg "// Add menu items with mnemonics to menu Bestand bestandMenu.add(nieuwMenuItem= new JMenuItem( Nieuw , N )); nieuwMenuItem.setIcon(new ImageIcon( new.gif )); bestandMenu.add(openMenuItem = new JMenuItem( Open , O )); openMenuItem.setIcon(new ImageIcon( open.gif )); bestandMenu.add(printMenuItem = new JMenuItem( Print , P )); bestandMenu.add(sluitMenuItem = new JMenuItem( Afsluiten , A )); setSize(300,300); setVisible(true); } //execute application public static void main(String[] args) { MenuIcon application = new MenuIcon(); application.setDefaultCloseOperation(JFrame.EXIT_ON_CLOSE); }")
48
48 8 Gebruik van JPopupMenu’ s Context-gevoelige popup menu’s JPopupMenu Het menu wordt gegenereert afhankelijk van de gekozen component.

49
49 VB: Een programma dat een JPopupMenu maakt

50
1 // Fig. 14.10: PopupTest.java 2 // Demonstrating JPopupMenus 3 import java.awt.*; 4 import java.awt.event.*; 5 import javax.swing.*; 6 7 public class PopupTest extends JFrame { 8 private JRadioButtonMenuItem items[]; 9 private final Color colorValues[] = 10 { Color.BLUE, Color.YELLOW, Color.RED }; 11 private JPopupMenu popupMenu; 12 13 // set up GUI 14 public PopupTest() 15 { 16 super( "Using JPopupMenus" ); 17 18 ItemHandler handler = new ItemHandler(); 19 String colors[] = { "Blue", "Yellow", "Red" }; 20 21 // set up popup menu and its items 22 ButtonGroup colorGroup = new ButtonGroup(); 23 popupMenu = new JPopupMenu(); 24 items = new JRadioButtonMenuItem[ 3 ]; 25 Maak een JPopupMenu object
 15 { 16 super( Using JPopupMenus ); ItemHandler handler = new ItemHandler(); 19 String colors[] = { Blue , Yellow , Red }; // set up popup menu and its items 22 ButtonGroup colorGroup = new ButtonGroup(); 23 popupMenu = new JPopupMenu(); 24 items = new JRadioButtonMenuItem[ 3 ]; 25 Maak een JPopupMenu object.")
51
26 // construct each menu item and add to popup menu; also 27 // enable event handling for each menu item 28 for ( int count = 0; count < items.length; count++ ) { 29 items[ count ] = new JRadioButtonMenuItem( colors[ count ] ); 30 popupMenu.add( items[ count ] ); 31 colorGroup.add( items[ count ] ); 32 items[ count ].addActionListener( handler ); 33 } 34 35 getContentPane().setBackground( Color.WHITE ); 36 37 // declare a MouseListener for the window that displays 38 // a JPopupMenu when the popup trigger event occurs 39 addMouseListener( 40 41 new MouseAdapter() { // anonymous inner class 42 43 // handle mouse press event 44 public void mousePressed( MouseEvent event ) 45 { 46 checkForTriggerEvent( event ); 47 } 48 49 // handle mouse release event 50 public void mouseReleased( MouseEvent event ) 51 { 52 checkForTriggerEvent( event ); 53 } Maak JRadioButtonMenuItem objecten om aan JPopupMenu toe te voegen Bepaal of popup-trigger event plaatsvond wanneer de gebruiker de muistoets indrukt of loslaat
![26 // construct each menu item and add to popup menu; also 27 // enable event handling for each menu item 28 for ( int count = 0; count < items.length; count++ ) { 29 items[ count ] = new JRadioButtonMenuItem( colors[ count ] ); 30 popupMenu.add( items[ count ] ); 31 colorGroup.add( items[ count ] ); 32 items[ count ].addActionListener( handler ); 33 } getContentPane().setBackground( Color.WHITE ); // declare a MouseListener for the window that displays 38 // a JPopupMenu when the popup trigger event occurs 39 addMouseListener( new MouseAdapter() { // anonymous inner class // handle mouse press event 44 public void mousePressed( MouseEvent event ) 45 { 46 checkForTriggerEvent( event ); 47 } // handle mouse release event 50 public void mouseReleased( MouseEvent event ) 51 { 52 checkForTriggerEvent( event ); 53 } Maak JRadioButtonMenuItem objecten om aan JPopupMenu toe te voegen Bepaal of popup-trigger event plaatsvond wanneer de gebruiker de muistoets indrukt of loslaat](http://images.slideplayer.nl/9/2234003/slides/slide_51.jpg "26 // construct each menu item and add to popup menu; also 27 // enable event handling for each menu item 28 for ( int count = 0; count < items.length; count++ ) { 29 items[ count ] = new JRadioButtonMenuItem( colors[ count ] ); 30 popupMenu.add( items[ count ] ); 31 colorGroup.add( items[ count ] ); 32 items[ count ].addActionListener( handler ); 33 } getContentPane().setBackground( Color.WHITE ); // declare a MouseListener for the window that displays 38 // a JPopupMenu when the popup trigger event occurs 39 addMouseListener( new MouseAdapter() { // anonymous inner class // handle mouse press event 44 public void mousePressed( MouseEvent event ) 45 { 46 checkForTriggerEvent( event ); 47 } // handle mouse release event 50 public void mouseReleased( MouseEvent event ) 51 { 52 checkForTriggerEvent( event ); 53 } Maak JRadioButtonMenuItem objecten om aan JPopupMenu toe te voegen Bepaal of popup-trigger event plaatsvond wanneer de gebruiker de muistoets indrukt of loslaat")
52
54 55 // determine whether event should trigger popup menu 56 private void checkForTriggerEvent( MouseEvent event ) 57 { 58 if ( event.isPopupTrigger() ) 59 popupMenu.show( 60 event.getComponent(), event.getX(), event.getY() ); 61 } 62 63 } // end anonymous inner clas 64 65 ); // end call to addMouseListener 66 67 setSize( 300, 200 ); 68 setVisible( true ); 69 70 } // end constructor PopupTest 71 72 public static void main( String args[] ) 73 { 74 PopupTest application = new PopupTest(); 75 application.setDefaultCloseOperation( JFrame.EXIT_ON_CLOSE ); 76 } 77 Toon JPopupMenu wanneer popup-trigger plaatsvond
![54 55 // determine whether event should trigger popup menu 56 private void checkForTriggerEvent( MouseEvent event ) 57 { 58 if ( event.isPopupTrigger() ) 59 popupMenu.show( 60 event.getComponent(), event.getX(), event.getY() ); 61 } } // end anonymous inner clas ); // end call to addMouseListener setSize( 300, 200 ); 68 setVisible( true ); } // end constructor PopupTest public static void main( String args[] ) 73 { 74 PopupTest application = new PopupTest(); 75 application.setDefaultCloseOperation( JFrame.EXIT_ON_CLOSE ); 76 } 77 Toon JPopupMenu wanneer popup-trigger plaatsvond](http://images.slideplayer.nl/9/2234003/slides/slide_52.jpg "54 55 // determine whether event should trigger popup menu 56 private void checkForTriggerEvent( MouseEvent event ) 57 { 58 if ( event.isPopupTrigger() ) 59 popupMenu.show( 60 event.getComponent(), event.getX(), event.getY() ); 61 } } // end anonymous inner clas ); // end call to addMouseListener setSize( 300, 200 ); 68 setVisible( true ); } // end constructor PopupTest public static void main( String args[] ) 73 { 74 PopupTest application = new PopupTest(); 75 application.setDefaultCloseOperation( JFrame.EXIT_ON_CLOSE ); 76 } 77 Toon JPopupMenu wanneer popup-trigger plaatsvond")
53
78 // private inner class to handle menu item events 79 private class ItemHandler implements ActionListener { 80 81 // process menu item selections 82 public void actionPerformed( ActionEvent event ) 83 { 84 // determine which menu item was selected 85 for ( int i = 0; i < items.length; i++ ) 86 if ( event.getSource() == items[ i ] ) { 87 getContentPane().setBackground( colorValues[ i ] ); 88 return; 89 } 90 } 91 92 } // end private inner class ItemHandler 93 94 } // end class PopupTest Opgeroepen wanneer de gebruiker JRadioButtonMenuItem selecteert Bepaal welk JRadioButtonMenuItem geselecteerd was, zet dan de achtergrondkleur van het venster
![78 // private inner class to handle menu item events 79 private class ItemHandler implements ActionListener { // process menu item selections 82 public void actionPerformed( ActionEvent event ) 83 { 84 // determine which menu item was selected 85 for ( int i = 0; i < items.length; i++ ) 86 if ( event.getSource() == items[ i ] ) { 87 getContentPane().setBackground( colorValues[ i ] ); 88 return; 89 } 90 } } // end private inner class ItemHandler } // end class PopupTest Opgeroepen wanneer de gebruiker JRadioButtonMenuItem selecteert Bepaal welk JRadioButtonMenuItem geselecteerd was, zet dan de achtergrondkleur van het venster](http://images.slideplayer.nl/9/2234003/slides/slide_53.jpg "78 // private inner class to handle menu item events 79 private class ItemHandler implements ActionListener { // process menu item selections 82 public void actionPerformed( ActionEvent event ) 83 { 84 // determine which menu item was selected 85 for ( int i = 0; i < items.length; i++ ) 86 if ( event.getSource() == items[ i ] ) { 87 getContentPane().setBackground( colorValues[ i ] ); 88 return; 89 } 90 } } // end private inner class ItemHandler } // end class PopupTest Opgeroepen wanneer de gebruiker JRadioButtonMenuItem selecteert Bepaal welk JRadioButtonMenuItem geselecteerd was, zet dan de achtergrondkleur van het venster")
54
54 9 Pluggable Look-and-Feel Pluggable look-and-feel Verander de “look-and-feel” op een dynamische manier Microsoft Windows look-and-feel of een Motif look-and-feel Flexibel

55
55 VB: Een programma dat aantoont hoe je de look-and-feel van een Swing-GUI kan veranderen

56
1 // Fig. 14.11: LookAndFeelDemo.java 2 // Changing the look and feel. 3 import java.awt.*; 4 import java.awt.event.*; 5 import javax.swing.*; 6 7 public class LookAndFeelDemo extends JFrame { 8 private final String strings[] = { "Metal", "Motif", "Windows" }; 9 private UIManager.LookAndFeelInfo looks[]; 10 private JRadioButton radio[]; 11 private ButtonGroup group; 12 private JButton button; 13 private JLabel label; 14 private JComboBox comboBox; 15 16 // set up GUI 17 public LookAndFeelDemo() 18 { 19 super( "Look and Feel Demo" ); 20 21 Container container = getContentPane(); 22 23 // set up panel for NORTH of BorderLayout 24 JPanel northPanel = new JPanel(); 25 northPanel.setLayout( new GridLayout( 3, 1, 0, 5 ) ); 26 Bevat geïnstalleerde look-and-feel informatie
 18 { 19 super( Look and Feel Demo ); Container container = getContentPane(); // set up panel for NORTH of BorderLayout 24 JPanel northPanel = new JPanel(); 25 northPanel.setLayout( new GridLayout( 3, 1, 0, 5 ) ); 26 Bevat geïnstalleerde look-and-feel informatie.")
57
27 // set up label for NORTH panel 28 label = new JLabel( "This is a Metal look-and-feel", 29 SwingConstants.CENTER ); 30 northPanel.add( label ); 31 32 // set up button for NORTH panel 33 button = new JButton( "JButton" ); 34 northPanel.add( button ); 35 36 // set up combo box for NORTH panel 37 comboBox = new JComboBox( strings ); 38 northPanel.add( comboBox ); 39 40 // create array for radio buttons 41 radio = new JRadioButton[ strings.length ]; 42 43 // set up panel for SOUTH of BorderLayout 44 JPanel southPanel = new JPanel(); 45 southPanel.setLayout( new GridLayout( 1, radio.length ) ); 46 47 // set up radio buttons for SOUTH panel 48 group = new ButtonGroup(); 49 ItemHandler handler = new ItemHandler(); 50
![27 // set up label for NORTH panel 28 label = new JLabel( This is a Metal look-and-feel , 29 SwingConstants.CENTER ); 30 northPanel.add( label ); // set up button for NORTH panel 33 button = new JButton( JButton ); 34 northPanel.add( button ); // set up combo box for NORTH panel 37 comboBox = new JComboBox( strings ); 38 northPanel.add( comboBox ); // create array for radio buttons 41 radio = new JRadioButton[ strings.length ]; // set up panel for SOUTH of BorderLayout 44 JPanel southPanel = new JPanel(); 45 southPanel.setLayout( new GridLayout( 1, radio.length ) ); // set up radio buttons for SOUTH panel 48 group = new ButtonGroup(); 49 ItemHandler handler = new ItemHandler(); 50](http://images.slideplayer.nl/9/2234003/slides/slide_57.jpg "27 // set up label for NORTH panel 28 label = new JLabel( This is a Metal look-and-feel , 29 SwingConstants.CENTER ); 30 northPanel.add( label ); // set up button for NORTH panel 33 button = new JButton( JButton ); 34 northPanel.add( button ); // set up combo box for NORTH panel 37 comboBox = new JComboBox( strings ); 38 northPanel.add( comboBox ); // create array for radio buttons 41 radio = new JRadioButton[ strings.length ]; // set up panel for SOUTH of BorderLayout 44 JPanel southPanel = new JPanel(); 45 southPanel.setLayout( new GridLayout( 1, radio.length ) ); // set up radio buttons for SOUTH panel 48 group = new ButtonGroup(); 49 ItemHandler handler = new ItemHandler(); 50")
58
51 for ( int count = 0; count < radio.length; count++ ) { 52 radio[ count ] = new JRadioButton( strings[ count ] ); 53 radio[ count ].addItemListener( handler ); 54 group.add( radio[ count ] ); 55 southPanel.add( radio[ count ] ); 56 } 57 58 // attach NORTH and SOUTH panels to content pane 59 container.add( northPanel, BorderLayout.NORTH ); 60 container.add( southPanel, BorderLayout.SOUTH ); 61 62 // get installed look-and-feel information 63 looks = UIManager.getInstalledLookAndFeels(); 64 65 setSize( 300, 200 ); 66 setVisible( true ); 67 68 radio[ 0 ].setSelected( true ); 69 70 } // end constructor LookAndFeelDemo 71 72 // use UIManager to change look-and-feel of GUI 73 private void changeTheLookAndFeel( int value ) 74 {
![51 for ( int count = 0; count < radio.length; count++ ) { 52 radio[ count ] = new JRadioButton( strings[ count ] ); 53 radio[ count ].addItemListener( handler ); 54 group.add( radio[ count ] ); 55 southPanel.add( radio[ count ] ); 56 } // attach NORTH and SOUTH panels to content pane 59 container.add( northPanel, BorderLayout.NORTH ); 60 container.add( southPanel, BorderLayout.SOUTH ); // get installed look-and-feel information 63 looks = UIManager.getInstalledLookAndFeels(); setSize( 300, 200 ); 66 setVisible( true ); radio[ 0 ].setSelected( true ); } // end constructor LookAndFeelDemo // use UIManager to change look-and-feel of GUI 73 private void changeTheLookAndFeel( int value ) 74 {](http://images.slideplayer.nl/9/2234003/slides/slide_58.jpg "51 for ( int count = 0; count < radio.length; count++ ) { 52 radio[ count ] = new JRadioButton( strings[ count ] ); 53 radio[ count ].addItemListener( handler ); 54 group.add( radio[ count ] ); 55 southPanel.add( radio[ count ] ); 56 } // attach NORTH and SOUTH panels to content pane 59 container.add( northPanel, BorderLayout.NORTH ); 60 container.add( southPanel, BorderLayout.SOUTH ); // get installed look-and-feel information 63 looks = UIManager.getInstalledLookAndFeels(); setSize( 300, 200 ); 66 setVisible( true ); radio[ 0 ].setSelected( true ); } // end constructor LookAndFeelDemo // use UIManager to change look-and-feel of GUI 73 private void changeTheLookAndFeel( int value ) 74 {")
59
75 // change look and feel 76 try { 77 UIManager.setLookAndFeel( looks[ value ].getClassName() ); 78 SwingUtilities.updateComponentTreeUI( this ); 79 } 80 81 // process problems changing look and feel 82 catch ( Exception exception ) { 83 exception.printStackTrace(); 84 } 85 } 86 87 public static void main( String args[] ) 88 { 89 LookAndFeelDemo application = new LookAndFeelDemo(); 90 application.setDefaultCloseOperation( JFrame.EXIT_ON_CLOSE ); 91 } 92 93 // private inner class to handle radio button events 94 private class ItemHandler implements ItemListener { 95 96 // process user's look-and-feel selection 97 public void itemStateChanged( ItemEvent event ) 98 { 99 for ( int count = 0; count < radio.length; count++ ) 100 Verander de look- and-feel
![75 // change look and feel 76 try { 77 UIManager.setLookAndFeel( looks[ value ].getClassName() ); 78 SwingUtilities.updateComponentTreeUI( this ); 79 } // process problems changing look and feel 82 catch ( Exception exception ) { 83 exception.printStackTrace(); 84 } 85 } public static void main( String args[] ) 88 { 89 LookAndFeelDemo application = new LookAndFeelDemo(); 90 application.setDefaultCloseOperation( JFrame.EXIT_ON_CLOSE ); 91 } // private inner class to handle radio button events 94 private class ItemHandler implements ItemListener { // process user s look-and-feel selection 97 public void itemStateChanged( ItemEvent event ) 98 { 99 for ( int count = 0; count < radio.length; count++ ) 100 Verander de look- and-feel](http://images.slideplayer.nl/9/2234003/slides/slide_59.jpg "75 // change look and feel 76 try { 77 UIManager.setLookAndFeel( looks[ value ].getClassName() ); 78 SwingUtilities.updateComponentTreeUI( this ); 79 } // process problems changing look and feel 82 catch ( Exception exception ) { 83 exception.printStackTrace(); 84 } 85 } public static void main( String args[] ) 88 { 89 LookAndFeelDemo application = new LookAndFeelDemo(); 90 application.setDefaultCloseOperation( JFrame.EXIT_ON_CLOSE ); 91 } // private inner class to handle radio button events 94 private class ItemHandler implements ItemListener { // process user s look-and-feel selection 97 public void itemStateChanged( ItemEvent event ) 98 { 99 for ( int count = 0; count < radio.length; count++ ) 100 Verander de look- and-feel")
60
101 if ( radio[ count ].isSelected() ) { 102 label.setText( "This is a " + 103 strings[ count ] + " look-and-feel" ); 104 comboBox.setSelectedIndex( count ); 105 changeTheLookAndFeel( count ); 106 } 107 } 108 109 } // end private inner class ItemHandler 110 111 } // end class LookAndFeelDemo
![101 if ( radio[ count ].isSelected() ) { 102 label.setText( This is a strings[ count ] + look-and-feel ); 104 comboBox.setSelectedIndex( count ); 105 changeTheLookAndFeel( count ); 106 } 107 } } // end private inner class ItemHandler } // end class LookAndFeelDemo](http://images.slideplayer.nl/9/2234003/slides/slide_60.jpg "101 if ( radio[ count ].isSelected() ) { 102 label.setText( This is a strings[ count ] + look-and-feel ); 104 comboBox.setSelectedIndex( count ); 105 changeTheLookAndFeel( count ); 106 } 107 } } // end private inner class ItemHandler } // end class LookAndFeelDemo")
61
61 10 JDesktopPane en JInternalFrame Multiple document interface (MDI) Main (parent) window Child window Schakel vrij tussen de documenten
 Main (parent) window Child window Schakel vrij tussen de documenten")
62
62 VB: Multiple-document interface Toont het gebruik van JDesktopPane en JInternalFrame klassen die ondersteuning bieden voor MDI Interne Frames MinimMaximSluit Geminimaliseerde interne frames Plaats de muis window over een hoek om het formaat van het venster te veranderen (indien dit is toegestaan).
.")
63
1 // Fig. 14.12: DesktopTest.java 2 // Demonstrating JDesktopPane. 3 import java.awt.*; 4 import java.awt.event.*; 5 import javax.swing.*; 6 7 public class DesktopTest extends JFrame { 8 private JDesktopPane theDesktop; 9 10 // set up GUI 11 public DesktopTest() 12 { 13 super( "Using a JDesktopPane" ); 14 15 // create menu bar, menu and menu item 16 JMenuBar bar = new JMenuBar(); 17 JMenu addMenu = new JMenu( "Add" ); 18 JMenuItem newFrame = new JMenuItem( "Internal Frame" ); 19 20 addMenu.add( newFrame ); 21 bar.add( addMenu ); 22 23 setJMenuBar( bar ); 24 25 // set up desktop 26 theDesktop = new JDesktopPane(); 27 getContentPane().add( theDesktop ); Behandel JInternalFrame child windows getoond in JDesktopPane
 12 { 13 super( Using a JDesktopPane ); // create menu bar, menu and menu item 16 JMenuBar bar = new JMenuBar(); 17 JMenu addMenu = new JMenu( Add ); 18 JMenuItem newFrame = new JMenuItem( Internal Frame ); addMenu.add( newFrame ); 21 bar.add( addMenu ); setJMenuBar( bar ); // set up desktop 26 theDesktop = new JDesktopPane(); 27 getContentPane().add( theDesktop ); Behandel JInternalFrame child windows getoond in JDesktopPane.")
64
28 29 // set up listener for newFrame menu item 30 newFrame.addActionListener( 31 32 new ActionListener() { // anonymous inner class 33 34 // display new internal window 35 public void actionPerformed( ActionEvent event ) { 36 37 // create internal frame 38 JInternalFrame frame = new JInternalFrame( 39 "Internal Frame", true, true, true, true ); 40 41 // attach panel to internal frame content pane 42 Container container = frame.getContentPane(); 43 MyJPanel panel = new MyJPanel(); 44 container.add( panel, BorderLayout.CENTER ); 45 46 // set size internal frame to size of its contents 47 frame.pack(); 48 49 // attach internal frame to desktop and show it 50 theDesktop.add( frame ); 51 frame.setVisible( true ); 52 } 53 54 } // end anonymous inner class Behandel het event wanneer de gebruiker het JMenuItem selecteert Opgeroepen wanneer de gebruiker JMenuItem selecteert Maak een JInternalFrame object Gebruik het verkozen formaat voor het venster JPanels kunnen toegevoegd worden aan JInternalFrames
 { // anonymous inner class // display new internal window 35 public void actionPerformed( ActionEvent event ) { // create internal frame 38 JInternalFrame frame = new JInternalFrame( 39 Internal Frame , true, true, true, true ); // attach panel to internal frame content pane 42 Container container = frame.getContentPane(); 43 MyJPanel panel = new MyJPanel(); 44 container.add( panel, BorderLayout.CENTER ); // set size internal frame to size of its contents 47 frame.pack(); // attach internal frame to desktop and show it 50 theDesktop.add( frame ); 51 frame.setVisible( true ); 52 } } // end anonymous inner class Behandel het event wanneer de gebruiker het JMenuItem selecteert Opgeroepen wanneer de gebruiker JMenuItem selecteert Maak een JInternalFrame object Gebruik het verkozen formaat voor het venster JPanels kunnen toegevoegd worden aan JInternalFrames")
65
55 56 ); // end call to addActionListener 57 58 setSize( 600, 460 ); 59 setVisible( true ); 60 61 } // end constructor 62 63 public static void main( String args[] ) 64 { 65 DesktopTest application = new DesktopTest(); 66 application.setDefaultCloseOperation( JFrame.EXIT_ON_CLOSE ); 67 } 68 69 } // end class DesktopTest 70 71 // class to display an ImageIcon on a panel 72 class MyJPanel extends JPanel { 73 private ImageIcon imageIcon; 74 private String[] images = { "yellowflowers.png", "purpleflowers.png", 75 "redflowers.png", "redflowers2.png", "lavenderflowers.png" }; 76 77 // load image 78 public MyJPanel() 79 {
![55 56 ); // end call to addActionListener setSize( 600, 460 ); 59 setVisible( true ); } // end constructor public static void main( String args[] ) 64 { 65 DesktopTest application = new DesktopTest(); 66 application.setDefaultCloseOperation( JFrame.EXIT_ON_CLOSE ); 67 } } // end class DesktopTest // class to display an ImageIcon on a panel 72 class MyJPanel extends JPanel { 73 private ImageIcon imageIcon; 74 private String[] images = { yellowflowers.png , purpleflowers.png , 75 redflowers.png , redflowers2.png , lavenderflowers.png }; // load image 78 public MyJPanel() 79 {](http://images.slideplayer.nl/9/2234003/slides/slide_65.jpg "55 56 ); // end call to addActionListener setSize( 600, 460 ); 59 setVisible( true ); } // end constructor public static void main( String args[] ) 64 { 65 DesktopTest application = new DesktopTest(); 66 application.setDefaultCloseOperation( JFrame.EXIT_ON_CLOSE ); 67 } } // end class DesktopTest // class to display an ImageIcon on a panel 72 class MyJPanel extends JPanel { 73 private ImageIcon imageIcon; 74 private String[] images = { yellowflowers.png , purpleflowers.png , 75 redflowers.png , redflowers2.png , lavenderflowers.png }; // load image 78 public MyJPanel() 79 {")
66
80 int randomNumber = ( int ) ( Math.random() * 5 ); 81 imageIcon = new ImageIcon( images[ randomNumber ] ); 82 } 83 84 // display imageIcon on panel 85 public void paintComponent( Graphics g ) 86 { 87 // call superclass paintComponent method 88 super.paintComponent( g ); 89 90 // display icon 91 imageIcon.paintIcon( this, g, 0, 0 ); 92 } 93 94 // return image dimensions 95 public Dimension getPreferredSize() 96 { 97 return new Dimension( imageIcon.getIconWidth(), 98 imageIcon.getIconHeight() ); 99 } 100 101 } // end class MyJPanel
![80 int randomNumber = ( int ) ( Math.random() * 5 ); 81 imageIcon = new ImageIcon( images[ randomNumber ] ); 82 } // display imageIcon on panel 85 public void paintComponent( Graphics g ) 86 { 87 // call superclass paintComponent method 88 super.paintComponent( g ); // display icon 91 imageIcon.paintIcon( this, g, 0, 0 ); 92 } // return image dimensions 95 public Dimension getPreferredSize() 96 { 97 return new Dimension( imageIcon.getIconWidth(), 98 imageIcon.getIconHeight() ); 99 } } // end class MyJPanel](http://images.slideplayer.nl/9/2234003/slides/slide_66.jpg "80 int randomNumber = ( int ) ( Math.random() * 5 ); 81 imageIcon = new ImageIcon( images[ randomNumber ] ); 82 } // display imageIcon on panel 85 public void paintComponent( Graphics g ) 86 { 87 // call superclass paintComponent method 88 super.paintComponent( g ); // display icon 91 imageIcon.paintIcon( this, g, 0, 0 ); 92 } // return image dimensions 95 public Dimension getPreferredSize() 96 { 97 return new Dimension( imageIcon.getIconWidth(), 98 imageIcon.getIconHeight() ); 99 } } // end class MyJPanel")
67
Interne Frames MinimaliserenMaximaliserenSluiten Geminimaliseerde interne frames Plaats de muis window over een hoek om het formaat van het venster te veranderen (indien dit is toegestaan).
.")
69
69 11 JTabbedPane Rangschikt GUI componenten in lagen “layers” Een laag zichtbaar tegelijk Toegang tot elke laag via een tab JTabbedPane

70
70 VB: JTabbedPane wordt gebruikt om GUI componenten te organiseren

71
1 // Fig. 14.13: JTabbedPaneDemo.java 2 // Demonstrating JTabbedPane. 3 import java.awt.*; 4 import javax.swing.*; 5 6 public class JTabbedPaneDemo extends JFrame { 7 8 // set up GUI 9 public JTabbedPaneDemo() 10 { 11 super( "JTabbedPane Demo " ); 12 13 // create JTabbedPane 14 JTabbedPane tabbedPane = new JTabbedPane(); 15 16 // set up pane11 and add it to JTabbedPane 17 JLabel label1 = new JLabel( "panel one", SwingConstants.CENTER ); 18 JPanel panel1 = new JPanel(); 19 panel1.add( label1 ); 20 tabbedPane.addTab( "Tab One", null, panel1, "First Panel" ); 21 22 // set up panel2 and add it to JTabbedPane 23 JLabel label2 = new JLabel( "panel two", SwingConstants.CENTER ); 24 JPanel panel2 = new JPanel(); 25 panel2.setBackground( Color.YELLOW ); 26 panel2.add( label2 ); 27 tabbedPane.addTab( "Tab Two", null, panel2, "Second Panel" ); Maak een JTabbedPane Voeg het eerste panel toe Voeg het tweede panel toe
 10 { 11 super( JTabbedPane Demo ); // create JTabbedPane 14 JTabbedPane tabbedPane = new JTabbedPane(); // set up pane11 and add it to JTabbedPane 17 JLabel label1 = new JLabel( panel one , SwingConstants.CENTER ); 18 JPanel panel1 = new JPanel(); 19 panel1.add( label1 ); 20 tabbedPane.addTab( Tab One , null, panel1, First Panel ); // set up panel2 and add it to JTabbedPane 23 JLabel label2 = new JLabel( panel two , SwingConstants.CENTER ); 24 JPanel panel2 = new JPanel(); 25 panel2.setBackground( Color.YELLOW ); 26 panel2.add( label2 ); 27 tabbedPane.addTab( Tab Two , null, panel2, Second Panel ); Maak een JTabbedPane Voeg het eerste panel toe Voeg het tweede panel toe.")
72
28 29 // set up panel3 and add it to JTabbedPane 30 JLabel label3 = new JLabel( "panel three" ); 31 JPanel panel3 = new JPanel(); 32 panel3.setLayout( new BorderLayout() ); 33 panel3.add( new JButton( "North" ), BorderLayout.NORTH ); 34 panel3.add( new JButton( "West" ), BorderLayout.WEST ); 35 panel3.add( new JButton( "East" ), BorderLayout.EAST ); 36 panel3.add( new JButton( "South" ), BorderLayout.SOUTH ); 37 panel3.add( label3, BorderLayout.CENTER ); 38 tabbedPane.addTab( "Tab Three", null, panel3, "Third Panel" ); 39 40 // add JTabbedPane to container 41 getContentPane().add( tabbedPane ); 42 43 setSize( 250, 200 ); 44 setVisible( true ); 45 46 } // end constructor 47 48 public static void main( String args[] ) 49 { 50 JTabbedPaneDemo tabbedPaneDemo = new JTabbedPaneDemo(); 51 tabbedPaneDemo.setDefaultCloseOperation( JFrame.EXIT_ON_CLOSE ); 52 } 53 54 } // end class CardDeck Voeg het derde panel toe
![28 29 // set up panel3 and add it to JTabbedPane 30 JLabel label3 = new JLabel( panel three ); 31 JPanel panel3 = new JPanel(); 32 panel3.setLayout( new BorderLayout() ); 33 panel3.add( new JButton( North ), BorderLayout.NORTH ); 34 panel3.add( new JButton( West ), BorderLayout.WEST ); 35 panel3.add( new JButton( East ), BorderLayout.EAST ); 36 panel3.add( new JButton( South ), BorderLayout.SOUTH ); 37 panel3.add( label3, BorderLayout.CENTER ); 38 tabbedPane.addTab( Tab Three , null, panel3, Third Panel ); // add JTabbedPane to container 41 getContentPane().add( tabbedPane ); setSize( 250, 200 ); 44 setVisible( true ); } // end constructor public static void main( String args[] ) 49 { 50 JTabbedPaneDemo tabbedPaneDemo = new JTabbedPaneDemo(); 51 tabbedPaneDemo.setDefaultCloseOperation( JFrame.EXIT_ON_CLOSE ); 52 } } // end class CardDeck Voeg het derde panel toe](http://images.slideplayer.nl/9/2234003/slides/slide_72.jpg "28 29 // set up panel3 and add it to JTabbedPane 30 JLabel label3 = new JLabel( panel three ); 31 JPanel panel3 = new JPanel(); 32 panel3.setLayout( new BorderLayout() ); 33 panel3.add( new JButton( North ), BorderLayout.NORTH ); 34 panel3.add( new JButton( West ), BorderLayout.WEST ); 35 panel3.add( new JButton( East ), BorderLayout.EAST ); 36 panel3.add( new JButton( South ), BorderLayout.SOUTH ); 37 panel3.add( label3, BorderLayout.CENTER ); 38 tabbedPane.addTab( Tab Three , null, panel3, Third Panel ); // add JTabbedPane to container 41 getContentPane().add( tabbedPane ); setSize( 250, 200 ); 44 setVisible( true ); } // end constructor public static void main( String args[] ) 49 { 50 JTabbedPaneDemo tabbedPaneDemo = new JTabbedPaneDemo(); 51 tabbedPaneDemo.setDefaultCloseOperation( JFrame.EXIT_ON_CLOSE ); 52 } } // end class CardDeck Voeg het derde panel toe")
74
74 12 Layout Managers Layout Managers BoxLayout GridBagLayout

75
75 Bijkomende Layoutmanagers

76
76 BoxLayout layout manager BoxLayout Rangschikt GUI componenten Horizontaal langs x-as Verticaal langs y-as

77
77 VB: Een programma dat BoxLayout illustreert met de class Box die BoxLayout als de default layout manager gebruikt

78
1 // Fig. 14.15: BoxLayoutDemo.java 2 // Demonstrating BoxLayout. 3 import java.awt.*; 4 import java.awt.event.*; 5 import javax.swing.*; 6 7 public class BoxLayoutDemo extends JFrame { 8 9 // set up GUI 10 public BoxLayoutDemo() 11 { 12 super( "Demostrating BoxLayout" ); 13 14 // create Box containers with BoxLayout 15 Box horizontal1 = Box.createHorizontalBox(); 16 Box vertical1 = Box.createVerticalBox(); 17 Box horizontal2 = Box.createHorizontalBox(); 18 Box vertical2 = Box.createVerticalBox(); 19 20 final int SIZE = 3; // number of buttons on each Box 21 22 // add buttons to Box horizontal1 23 for ( int count = 0; count < SIZE; count++ ) 24 horizontal1.add( new JButton( "Button " + count ) ); 25 Maak BoxesVoeg drie JButtons toe aan horizontale Box
 11 { 12 super( Demostrating BoxLayout ); // create Box containers with BoxLayout 15 Box horizontal1 = Box.createHorizontalBox(); 16 Box vertical1 = Box.createVerticalBox(); 17 Box horizontal2 = Box.createHorizontalBox(); 18 Box vertical2 = Box.createVerticalBox(); final int SIZE = 3; // number of buttons on each Box // add buttons to Box horizontal1 23 for ( int count = 0; count < SIZE; count++ ) 24 horizontal1.add( new JButton( Button + count ) ); 25 Maak BoxesVoeg drie JButtons toe aan horizontale Box.")
79
26 // create strut and add buttons to Box vertical1 27 for ( int count = 0; count < SIZE; count++ ) { 28 vertical1.add( Box.createVerticalStrut( 25 ) ); 29 vertical1.add( new JButton( "Button " + count ) ); 30 } 31 32 // create horizontal glue and add buttons to Box horizontal2 33 for ( int count = 0; count < SIZE; count++ ) { 34 horizontal2.add( Box.createHorizontalGlue() ); 35 horizontal2.add( new JButton( "Button " + count ) ); 36 } 37 38 // create rigid area and add buttons to Box vertical2 39 for ( int count = 0; count < SIZE; count++ ) { 40 vertical2.add( Box.createRigidArea( new Dimension( 12, 8 ) ) ); 41 vertical2.add( new JButton( "Button " + count ) ); 42 } 43 44 // create vertical glue and add buttons to panel 45 JPanel panel = new JPanel(); 46 panel.setLayout( new BoxLayout( panel, BoxLayout.Y_AXIS ) ); 47 48 for ( int count = 0; count < SIZE; count++ ) { 49 panel.add( Box.createGlue() ); 50 panel.add( new JButton( "Button " + count ) ); 51 } 52 Voeg drie JButtons toe aan verticale Box Strut garandeert ruimte tussen de componenten Voeg drie Buttons toe aan horizontale Box Glue garandeert uitbreidbare ruimte tussen de componenten Voeg drie JButtons aan verticale Box toe Rigid gebied garandeert een vaste component grootte
 { 28 vertical1.add( Box.createVerticalStrut( 25 ) ); 29 vertical1.add( new JButton( Button + count ) ); 30 } // create horizontal glue and add buttons to Box horizontal2 33 for ( int count = 0; count < SIZE; count++ ) { 34 horizontal2.add( Box.createHorizontalGlue() ); 35 horizontal2.add( new JButton( Button + count ) ); 36 } // create rigid area and add buttons to Box vertical2 39 for ( int count = 0; count < SIZE; count++ ) { 40 vertical2.add( Box.createRigidArea( new Dimension( 12, 8 ) ) ); 41 vertical2.add( new JButton( Button + count ) ); 42 } // create vertical glue and add buttons to panel 45 JPanel panel = new JPanel(); 46 panel.setLayout( new BoxLayout( panel, BoxLayout.Y_AXIS ) ); for ( int count = 0; count < SIZE; count++ ) { 49 panel.add( Box.createGlue() ); 50 panel.add( new JButton( Button + count ) ); 51 } 52 Voeg drie JButtons toe aan verticale Box Strut garandeert ruimte tussen de componenten Voeg drie Buttons toe aan horizontale Box Glue garandeert uitbreidbare ruimte tussen de componenten Voeg drie JButtons aan verticale Box toe Rigid gebied garandeert een vaste component grootte")
80
53 // create a JTabbedPane 54 JTabbedPane tabs = new JTabbedPane( 55 JTabbedPane.TOP, JTabbedPane.SCROLL_TAB_LAYOUT ); 56 57 // place each container on tabbed pane 58 tabs.addTab( "Horizontal Box", horizontal1 ); 59 tabs.addTab( "Vertical Box with Struts", vertical1 ); 60 tabs.addTab( "Horizontal Box with Glue", horizontal2 ); 61 tabs.addTab( "Vertical Box with Rigid Areas", vertical2 ); 62 tabs.addTab( "Vertical Box with Glue", panel ); 63 64 getContentPane().add( tabs ); // place tabbed pane on content pane 65 66 setSize( 400, 220 ); 67 setVisible( true ); 68 69 } // end constructor 70 71 public static void main( String args[] ) 72 { 73 BoxLayoutDemo application = new BoxLayoutDemo(); 74 application.setDefaultCloseOperation( JFrame.EXIT_ON_CLOSE ); 75 } 76 77 } // end class BoxLayoutDemo Maak een JTabbedPane om de Boxes vast te houden
![53 // create a JTabbedPane 54 JTabbedPane tabs = new JTabbedPane( 55 JTabbedPane.TOP, JTabbedPane.SCROLL_TAB_LAYOUT ); // place each container on tabbed pane 58 tabs.addTab( Horizontal Box , horizontal1 ); 59 tabs.addTab( Vertical Box with Struts , vertical1 ); 60 tabs.addTab( Horizontal Box with Glue , horizontal2 ); 61 tabs.addTab( Vertical Box with Rigid Areas , vertical2 ); 62 tabs.addTab( Vertical Box with Glue , panel ); getContentPane().add( tabs ); // place tabbed pane on content pane setSize( 400, 220 ); 67 setVisible( true ); } // end constructor public static void main( String args[] ) 72 { 73 BoxLayoutDemo application = new BoxLayoutDemo(); 74 application.setDefaultCloseOperation( JFrame.EXIT_ON_CLOSE ); 75 } } // end class BoxLayoutDemo Maak een JTabbedPane om de Boxes vast te houden](http://images.slideplayer.nl/9/2234003/slides/slide_80.jpg "53 // create a JTabbedPane 54 JTabbedPane tabs = new JTabbedPane( 55 JTabbedPane.TOP, JTabbedPane.SCROLL_TAB_LAYOUT ); // place each container on tabbed pane 58 tabs.addTab( Horizontal Box , horizontal1 ); 59 tabs.addTab( Vertical Box with Struts , vertical1 ); 60 tabs.addTab( Horizontal Box with Glue , horizontal2 ); 61 tabs.addTab( Vertical Box with Rigid Areas , vertical2 ); 62 tabs.addTab( Vertical Box with Glue , panel ); getContentPane().add( tabs ); // place tabbed pane on content pane setSize( 400, 220 ); 67 setVisible( true ); } // end constructor public static void main( String args[] ) 72 { 73 BoxLayoutDemo application = new BoxLayoutDemo(); 74 application.setDefaultCloseOperation( JFrame.EXIT_ON_CLOSE ); 75 } } // end class BoxLayoutDemo Maak een JTabbedPane om de Boxes vast te houden")
83
83 GridBagLayout layout manager. GridBagLayout Flexibel GridBagLayout componenten kunnen variëren in grootte componenten kunnen diverse rijen en kolommen bezetten componenten kunnen in elke volgorde toegevoegd worden Gebruikt GridBagConstraints Specificeert hoe de component geplaatst wordt in de GridBagLayout

84
84 Het ontwerpen van een GUI dat GridBagLayout zal gebruiken

85
85 GridBagConstraints velden

86
86 GridBagLayout met de extra ruimtes op nul geplaatst

87
87 VB: Een programma dat GridBagLayout gebruikt om de componenten in een GUI te schikken

88
1 // Fig. 14.19: GridBagDemo.java 2 // Demonstrating GridBagLayout. 3 import java.awt.*; 4 import java.awt.event.*; 5 import javax.swing.*; 6 7 public class GridBagDemo extends JFrame { 8 private Container container; 9 private GridBagLayout layout; 10 private GridBagConstraints constraints; 11 12 // set up GUI 13 public GridBagDemo() 14 { 15 super( "GridBagLayout" ); 16 17 container = getContentPane(); 18 layout = new GridBagLayout(); 19 container.setLayout( layout ); 20 21 // instantiate gridbag constraints 22 constraints = new GridBagConstraints(); 23 24 // create GUI components 25 JTextArea textArea1 = new JTextArea( "TextArea1", 5, 10 ); 26 JTextArea textArea2 = new JTextArea( "TextArea2", 2, 2 ); 27 Zet GridBagLayout als layout manager Gebruikt om de locatie van de component te bepalen en zijn grootte in het raster
 14 { 15 super( GridBagLayout ); container = getContentPane(); 18 layout = new GridBagLayout(); 19 container.setLayout( layout ); // instantiate gridbag constraints 22 constraints = new GridBagConstraints(); // create GUI components 25 JTextArea textArea1 = new JTextArea( TextArea1 , 5, 10 ); 26 JTextArea textArea2 = new JTextArea( TextArea2 , 2, 2 ); 27 Zet GridBagLayout als layout manager Gebruikt om de locatie van de component te bepalen en zijn grootte in het raster.")
89
28 String names[] = { "Iron", "Steel", "Brass" }; 29 JComboBox comboBox = new JComboBox( names ); 30 31 JTextField textField = new JTextField( "TextField" ); 32 JButton button1 = new JButton( "Button 1" ); 33 JButton button2 = new JButton( "Button 2" ); 34 JButton button3 = new JButton( "Button 3" ); 35 36 // weightx and weighty for textArea1 are both 0: the default 37 // anchor for all components is CENTER: the default 38 constraints.fill = GridBagConstraints.BOTH; 39 addComponent( textArea1, 0, 0, 1, 3 ); 40 41 // weightx and weighty for button1 are both 0: the default 42 constraints.fill = GridBagConstraints.HORIZONTAL; 43 addComponent( button1, 0, 1, 2, 1 ); 44 45 // weightx and weighty for comboBox are both 0: the default 46 // fill is HORIZONTAL 47 addComponent( comboBox, 2, 1, 2, 1 ); 48 49 // button2 50 constraints.weightx = 1000; // can grow wider 51 constraints.weighty = 1; // can grow taller 52 constraints.fill = GridBagConstraints.BOTH; 53 addComponent( button2, 1, 1, 1, 1 ); 54 De eerste JTextArea overspant 1 rij en drie kolommen Indien de gebruiker de grootte van Container wijzigt, zal de eerste JTextArea zijn toegekende ruimte in het raster volledig vullen De eerste JButton overspant twee rijen en één kolom Indien de gebruiker de grootte van Container wijzigt, zal eerste JButton horizontaal in het raster gevuld worden Indien de gebruiker de grootte van Container wijzigt, zal de tweede JButton de extra ruimte opvullen
![28 String names[] = { Iron , Steel , Brass }; 29 JComboBox comboBox = new JComboBox( names ); JTextField textField = new JTextField( TextField ); 32 JButton button1 = new JButton( Button 1 ); 33 JButton button2 = new JButton( Button 2 ); 34 JButton button3 = new JButton( Button 3 ); // weightx and weighty for textArea1 are both 0: the default 37 // anchor for all components is CENTER: the default 38 constraints.fill = GridBagConstraints.BOTH; 39 addComponent( textArea1, 0, 0, 1, 3 ); // weightx and weighty for button1 are both 0: the default 42 constraints.fill = GridBagConstraints.HORIZONTAL; 43 addComponent( button1, 0, 1, 2, 1 ); // weightx and weighty for comboBox are both 0: the default 46 // fill is HORIZONTAL 47 addComponent( comboBox, 2, 1, 2, 1 ); // button2 50 constraints.weightx = 1000; // can grow wider 51 constraints.weighty = 1; // can grow taller 52 constraints.fill = GridBagConstraints.BOTH; 53 addComponent( button2, 1, 1, 1, 1 ); 54 De eerste JTextArea overspant 1 rij en drie kolommen Indien de gebruiker de grootte van Container wijzigt, zal de eerste JTextArea zijn toegekende ruimte in het raster volledig vullen De eerste JButton overspant twee rijen en één kolom Indien de gebruiker de grootte van Container wijzigt, zal eerste JButton horizontaal in het raster gevuld worden Indien de gebruiker de grootte van Container wijzigt, zal de tweede JButton de extra ruimte opvullen](http://images.slideplayer.nl/9/2234003/slides/slide_89.jpg "28 String names[] = { Iron , Steel , Brass }; 29 JComboBox comboBox = new JComboBox( names ); JTextField textField = new JTextField( TextField ); 32 JButton button1 = new JButton( Button 1 ); 33 JButton button2 = new JButton( Button 2 ); 34 JButton button3 = new JButton( Button 3 ); // weightx and weighty for textArea1 are both 0: the default 37 // anchor for all components is CENTER: the default 38 constraints.fill = GridBagConstraints.BOTH; 39 addComponent( textArea1, 0, 0, 1, 3 ); // weightx and weighty for button1 are both 0: the default 42 constraints.fill = GridBagConstraints.HORIZONTAL; 43 addComponent( button1, 0, 1, 2, 1 ); // weightx and weighty for comboBox are both 0: the default 46 // fill is HORIZONTAL 47 addComponent( comboBox, 2, 1, 2, 1 ); // button2 50 constraints.weightx = 1000; // can grow wider 51 constraints.weighty = 1; // can grow taller 52 constraints.fill = GridBagConstraints.BOTH; 53 addComponent( button2, 1, 1, 1, 1 ); 54 De eerste JTextArea overspant 1 rij en drie kolommen Indien de gebruiker de grootte van Container wijzigt, zal de eerste JTextArea zijn toegekende ruimte in het raster volledig vullen De eerste JButton overspant twee rijen en één kolom Indien de gebruiker de grootte van Container wijzigt, zal eerste JButton horizontaal in het raster gevuld worden Indien de gebruiker de grootte van Container wijzigt, zal de tweede JButton de extra ruimte opvullen")
90
55 // fill is BOTH for button3 56 constraints.weightx = 0; 57 constraints.weighty = 0; 58 addComponent( button3, 1, 2, 1, 1 ); 59 60 // weightx and weighty for textField are both 0, fill is BOTH 61 addComponent( textField, 3, 0, 2, 1 ); 62 63 // weightx and weighty for textArea2 are both 0, fill is BOTH 64 addComponent( textArea2, 3, 2, 1, 1 ); 65 66 setSize( 300, 150 ); 67 setVisible( true ); 68 69 } // end constructor GridBagDemo 70 71 // method to set constraints on 72 private void addComponent( Component component, 73 int row, int column, int width, int height ) 74 { 75 // set gridx and gridy 76 constraints.gridx = column; 77 constraints.gridy = row; 78
; // weightx and weighty for textField are both 0, fill is BOTH 61 addComponent( textField, 3, 0, 2, 1 ); // weightx and weighty for textArea2 are both 0, fill is BOTH 64 addComponent( textArea2, 3, 2, 1, 1 ); setSize( 300, 150 ); 67 setVisible( true ); } // end constructor GridBagDemo // method to set constraints on 72 private void addComponent( Component component, 73 int row, int column, int width, int height ) 74 { 75 // set gridx and gridy 76 constraints.gridx = column; 77 constraints.gridy = row; 78")
91
79 // set gridwidth and gridheight 80 constraints.gridwidth = width; 81 constraints.gridheight = height; 82 83 // set constraints and add component 84 layout.setConstraints( component, constraints ); 85 container.add( component ); 86 } 87 88 public static void main( String args[] ) 89 { 90 GridBagDemo application = new GridBagDemo(); 91 application.setDefaultCloseOperation( JFrame.EXIT_ON_CLOSE ); 92 } 93 94 } // end class GridBagDemo
![79 // set gridwidth and gridheight 80 constraints.gridwidth = width; 81 constraints.gridheight = height; // set constraints and add component 84 layout.setConstraints( component, constraints ); 85 container.add( component ); 86 } public static void main( String args[] ) 89 { 90 GridBagDemo application = new GridBagDemo(); 91 application.setDefaultCloseOperation( JFrame.EXIT_ON_CLOSE ); 92 } } // end class GridBagDemo](http://images.slideplayer.nl/9/2234003/slides/slide_91.jpg "79 // set gridwidth and gridheight 80 constraints.gridwidth = width; 81 constraints.gridheight = height; // set constraints and add component 84 layout.setConstraints( component, constraints ); 85 container.add( component ); 86 } public static void main( String args[] ) 89 { 90 GridBagDemo application = new GridBagDemo(); 91 application.setDefaultCloseOperation( JFrame.EXIT_ON_CLOSE ); 92 } } // end class GridBagDemo")
93
93 GridBagConstraints Constanten RELATIVE en REMAINDER Constanten RELATIVE en REMAINDER Gebruikt in plaats van de variabelen gridx en gridy RELATIVE Specificeert next-to-last component plaatsing in rij of kolom De component moet geplaatst worden naast diegene die voorafgaand werd toegevoegd. REMAINDER Specificeert de component als de laatste in rij of kolom

94
94 VB: De klasse GridBagDemo2 schikt de componenten in GridBagLayout met gebruik van de GridBagConstraints constanten

95
1 // Fig. 14.20: GridBagDemo2.java 2 // Demonstrating GridBagLayout constants. 3 import java.awt.*; 4 import java.awt.event.*; 5 import javax.swing.*; 6 7 public class GridBagDemo2 extends JFrame { 8 private GridBagLayout layout; 9 private GridBagConstraints constraints; 10 private Container container; 11 12 // set up GUI 13 public GridBagDemo2() 14 { 15 super( "GridBagLayout" ); 16 17 container = getContentPane(); 18 layout = new GridBagLayout(); 19 container.setLayout( layout ); 20 21 // instantiate gridbag constraints 22 constraints = new GridBagConstraints(); 23 24 // create GUI components 25 String metals[] = { "Copper", "Aluminum", "Silver" }; 26 JComboBox comboBox = new JComboBox( metals ); 27 Zet GridBagLayout als layout manager Gebruikt om de locatie van de component te bepalen en zijn grootte in het raster
 14 { 15 super( GridBagLayout ); container = getContentPane(); 18 layout = new GridBagLayout(); 19 container.setLayout( layout ); // instantiate gridbag constraints 22 constraints = new GridBagConstraints(); // create GUI components 25 String metals[] = { Copper , Aluminum , Silver }; 26 JComboBox comboBox = new JComboBox( metals ); 27 Zet GridBagLayout als layout manager Gebruikt om de locatie van de component te bepalen en zijn grootte in het raster.")
96
28 JTextField textField = new JTextField( "TextField" ); 29 30 String fonts[] = { "Serif", "Monospaced" }; 31 JList list = new JList( fonts ); 32 33 String names[] = { "zero", "one", "two", "three", "four" }; 34 JButton buttons[] = new JButton[ names.length ]; 35 36 for ( int count = 0; count < buttons.length; count++ ) 37 buttons[ count ] = new JButton( names[ count ] ); 38 39 // define GUI component constraints for textField 40 constraints.weightx = 1; 41 constraints.weighty = 1; 42 constraints.fill = GridBagConstraints.BOTH; 43 constraints.gridwidth = GridBagConstraints.REMAINDER; 44 addComponent( textField ); 45 46 // buttons[0] -- weightx and weighty are 1: fill is BOTH 47 constraints.gridwidth = 1; 48 addComponent( buttons[ 0 ] ); 49 50 // buttons[1] -- weightx and weighty are 1: fill is BOTH 51 constraints.gridwidth = GridBagConstraints.RELATIVE; 52 addComponent( buttons[ 1 ] ); 53 Specifieer textField als laatste (enige) component in de eerste rij Plaats buttons[0] als eerste component in de tweede rij Plaats buttons[1] rechts naast buttons[0]
![28 JTextField textField = new JTextField( TextField ); String fonts[] = { Serif , Monospaced }; 31 JList list = new JList( fonts ); String names[] = { zero , one , two , three , four }; 34 JButton buttons[] = new JButton[ names.length ]; for ( int count = 0; count < buttons.length; count++ ) 37 buttons[ count ] = new JButton( names[ count ] ); // define GUI component constraints for textField 40 constraints.weightx = 1; 41 constraints.weighty = 1; 42 constraints.fill = GridBagConstraints.BOTH; 43 constraints.gridwidth = GridBagConstraints.REMAINDER; 44 addComponent( textField ); // buttons[0] -- weightx and weighty are 1: fill is BOTH 47 constraints.gridwidth = 1; 48 addComponent( buttons[ 0 ] ); // buttons[1] -- weightx and weighty are 1: fill is BOTH 51 constraints.gridwidth = GridBagConstraints.RELATIVE; 52 addComponent( buttons[ 1 ] ); 53 Specifieer textField als laatste (enige) component in de eerste rij Plaats buttons[0] als eerste component in de tweede rij Plaats buttons[1] rechts naast buttons[0]](http://images.slideplayer.nl/9/2234003/slides/slide_96.jpg "28 JTextField textField = new JTextField( TextField ); String fonts[] = { Serif , Monospaced }; 31 JList list = new JList( fonts ); String names[] = { zero , one , two , three , four }; 34 JButton buttons[] = new JButton[ names.length ]; for ( int count = 0; count < buttons.length; count++ ) 37 buttons[ count ] = new JButton( names[ count ] ); // define GUI component constraints for textField 40 constraints.weightx = 1; 41 constraints.weighty = 1; 42 constraints.fill = GridBagConstraints.BOTH; 43 constraints.gridwidth = GridBagConstraints.REMAINDER; 44 addComponent( textField ); // buttons[0] -- weightx and weighty are 1: fill is BOTH 47 constraints.gridwidth = 1; 48 addComponent( buttons[ 0 ] ); // buttons[1] -- weightx and weighty are 1: fill is BOTH 51 constraints.gridwidth = GridBagConstraints.RELATIVE; 52 addComponent( buttons[ 1 ] ); 53 Specifieer textField als laatste (enige) component in de eerste rij Plaats buttons[0] als eerste component in de tweede rij Plaats buttons[1] rechts naast buttons[0]")
97
54 // buttons[2] -- weightx and weighty are 1: fill is BOTH 55 constraints.gridwidth = GridBagConstraints.REMAINDER; 56 addComponent( buttons[ 2 ] ); 57 58 // comboBox -- weightx is 1: fill is BOTH 59 constraints.weighty = 0; 60 constraints.gridwidth = GridBagConstraints.REMAINDER; 61 addComponent( comboBox ); 62 63 // buttons[3] -- weightx is 1: fill is BOTH 64 constraints.weighty = 1; 65 constraints.gridwidth = GridBagConstraints.REMAINDER; 66 addComponent( buttons[ 3 ] ); 67 68 // buttons[4] -- weightx and weighty are 1: fill is BOTH 69 constraints.gridwidth = GridBagConstraints.RELATIVE; 70 addComponent( buttons[ 4 ] ); 71 72 // list -- weightx and weighty are 1: fill is BOTH 73 constraints.gridwidth = GridBagConstraints.REMAINDER; 74 addComponent( list ); 75 76 setSize( 300, 200 ); 77 setVisible( true ); 78 79 } // end constructor 80 Plaats buttons[2] rechts naast buttons[1] Specifieer comboBox als laatste (enige) component in de derde rij Specifieer buttons[3] als laatste (enige) component in de vierde rij Plaats buttons[4] als eerste component in de vijfde rij Specifieer list als laatste component in de vijfde rij
![54 // buttons[2] -- weightx and weighty are 1: fill is BOTH 55 constraints.gridwidth = GridBagConstraints.REMAINDER; 56 addComponent( buttons[ 2 ] ); // comboBox -- weightx is 1: fill is BOTH 59 constraints.weighty = 0; 60 constraints.gridwidth = GridBagConstraints.REMAINDER; 61 addComponent( comboBox ); // buttons[3] -- weightx is 1: fill is BOTH 64 constraints.weighty = 1; 65 constraints.gridwidth = GridBagConstraints.REMAINDER; 66 addComponent( buttons[ 3 ] ); // buttons[4] -- weightx and weighty are 1: fill is BOTH 69 constraints.gridwidth = GridBagConstraints.RELATIVE; 70 addComponent( buttons[ 4 ] ); // list -- weightx and weighty are 1: fill is BOTH 73 constraints.gridwidth = GridBagConstraints.REMAINDER; 74 addComponent( list ); setSize( 300, 200 ); 77 setVisible( true ); } // end constructor 80 Plaats buttons[2] rechts naast buttons[1] Specifieer comboBox als laatste (enige) component in de derde rij Specifieer buttons[3] als laatste (enige) component in de vierde rij Plaats buttons[4] als eerste component in de vijfde rij Specifieer list als laatste component in de vijfde rij](http://images.slideplayer.nl/9/2234003/slides/slide_97.jpg "54 // buttons[2] -- weightx and weighty are 1: fill is BOTH 55 constraints.gridwidth = GridBagConstraints.REMAINDER; 56 addComponent( buttons[ 2 ] ); // comboBox -- weightx is 1: fill is BOTH 59 constraints.weighty = 0; 60 constraints.gridwidth = GridBagConstraints.REMAINDER; 61 addComponent( comboBox ); // buttons[3] -- weightx is 1: fill is BOTH 64 constraints.weighty = 1; 65 constraints.gridwidth = GridBagConstraints.REMAINDER; 66 addComponent( buttons[ 3 ] ); // buttons[4] -- weightx and weighty are 1: fill is BOTH 69 constraints.gridwidth = GridBagConstraints.RELATIVE; 70 addComponent( buttons[ 4 ] ); // list -- weightx and weighty are 1: fill is BOTH 73 constraints.gridwidth = GridBagConstraints.REMAINDER; 74 addComponent( list ); setSize( 300, 200 ); 77 setVisible( true ); } // end constructor 80 Plaats buttons[2] rechts naast buttons[1] Specifieer comboBox als laatste (enige) component in de derde rij Specifieer buttons[3] als laatste (enige) component in de vierde rij Plaats buttons[4] als eerste component in de vijfde rij Specifieer list als laatste component in de vijfde rij")
98
81 // add a Component to the container 82 private void addComponent( Component component ) 83 { 84 layout.setConstraints( component, constraints ); 85 container.add( component ); // add component 86 } 87 88 public static void main( String args[] ) 89 { 90 GridBagDemo2 application = new GridBagDemo2(); 91 application.setDefaultCloseOperation( JFrame.EXIT_ON_CLOSE ); 92 } 93 94 } // end class GridBagDemo2
![81 // add a Component to the container 82 private void addComponent( Component component ) 83 { 84 layout.setConstraints( component, constraints ); 85 container.add( component ); // add component 86 } public static void main( String args[] ) 89 { 90 GridBagDemo2 application = new GridBagDemo2(); 91 application.setDefaultCloseOperation( JFrame.EXIT_ON_CLOSE ); 92 } } // end class GridBagDemo2](http://images.slideplayer.nl/9/2234003/slides/slide_98.jpg "81 // add a Component to the container 82 private void addComponent( Component component ) 83 { 84 layout.setConstraints( component, constraints ); 85 container.add( component ); // add component 86 } public static void main( String args[] ) 89 { 90 GridBagDemo2 application = new GridBagDemo2(); 91 application.setDefaultCloseOperation( JFrame.EXIT_ON_CLOSE ); 92 } } // end class GridBagDemo2")
99
99 14 Design Patterns gebruikt in Packages java.awt en javax.swing Introductie van de “Design patterns” die gekoppeld zijn aan Java GUI componenten GUI componenten halen voordeel uit “design patterns”

Verwante presentaties

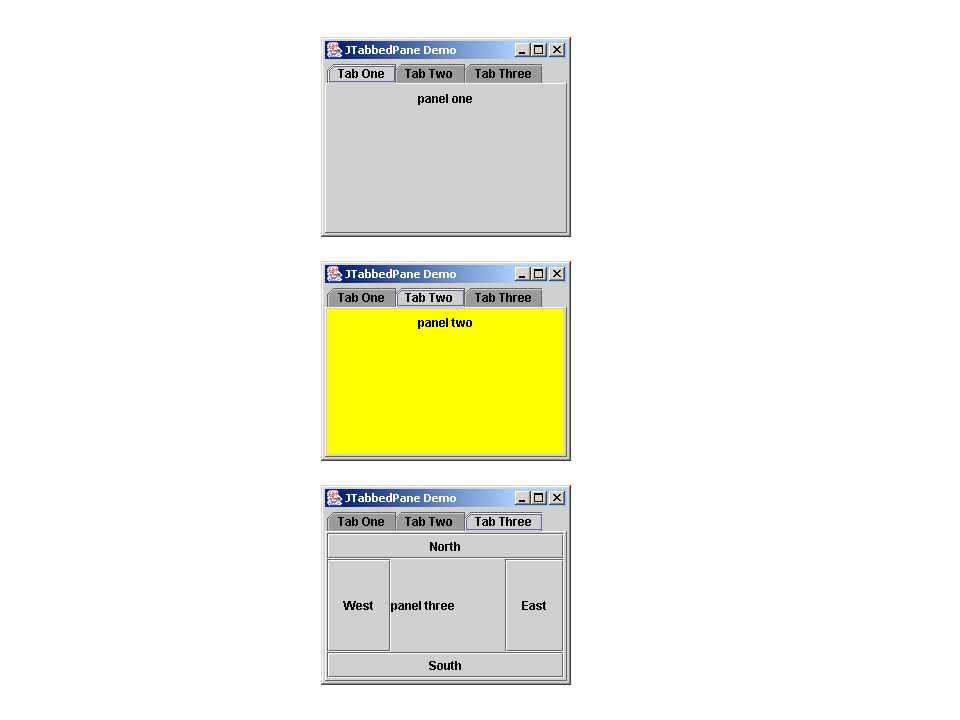
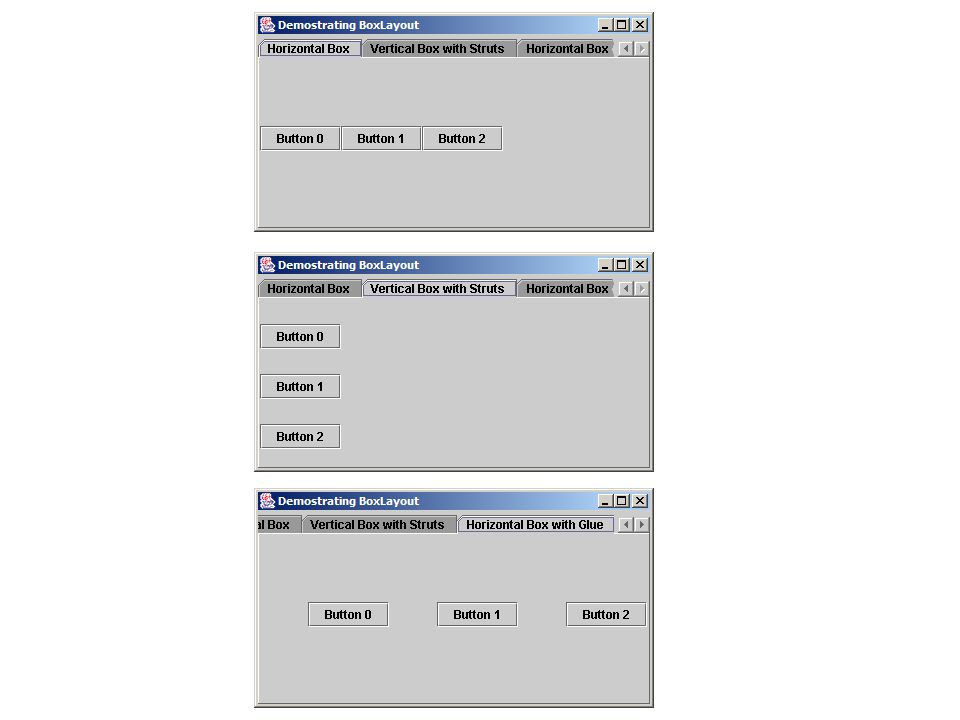

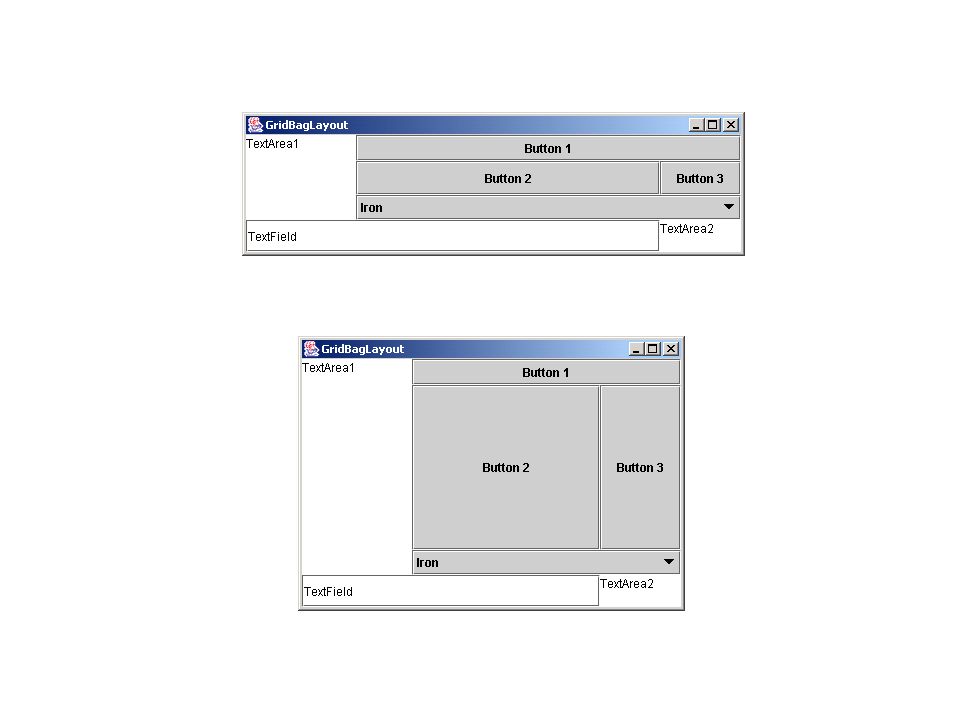


 DoelgroepVerzondenOntvangen% LG wonen en dagbesteding.>")


 Quiz Night !>")


