Download de presentatie
De presentatie wordt gedownload. Even geduld aub

1
BIOVEILIGHEID: wetgeving & werkelijkheid
René Custers regulatory & communications manager, VIB

2
Bioveiligheid Het veilig gebruik van levende organismen in het bijzonder pathogenen en GGO’s mbt: werknemersbescherming volksgezondheid, en leefmilieu

3
Wetgeving Werknemersbescherming Volksgezondheid en leefmilieu
EU richtlijn 2000/54 over risico’s verbonden aan blootstelling aan ‘biologische agentia’ op het werk Welzijnswet, KB biologische agentia Volksgezondheid en leefmilieu EU richtlijn 2009/41 over ingeperkt gebruik van GG micro-organisms Vlarem rubriek 51

4
Vlarem rubriek 51 Scope: Principes: Pathogenen
GGO’s (dus niet alleen GGM’s) Ingeperkt gebruik Principes: Milieuvergunning noodzakelijk Bioveiligheidstoelating voor de activiteit
 Ingeperkt gebruik. Principes: Milieuvergunning noodzakelijk. Bioveiligheidstoelating voor de activiteit.")
5
Vlarem rubriek 51 Milieuvergunning Procedure bioveiligheidsdossier
Zwaarte procedure afhankelijk van risiconiveau activiteit Procedure bioveiligheidsdossier Afhankelijk van: Type gebruik (eerste gebruik, volgend gebruik) Risiconiveau activiteit Onderscheid tussen: Toelatingsaanvraag Kennisgeving
 Risiconiveau activiteit. Onderscheid tussen: Toelatingsaanvraag. Kennisgeving.")
6
Welzijnswet / KB biologische agentia
Scope: Biologische agentia op het werk Principes: Risico-analyses uitvoeren en gepaste maatregelen treffen Melding aan FOD werk

7
Wat is de essentie? Risico-analyse voorafgaand aan de werkzaamheden
Gepaste (inperkings)maatregelen Maw: nadenken en vervolgens verantwoord handelen!
maatregelen. Maw: nadenken en vervolgens verantwoord handelen!")
8
Geen of verwaarloosbaar risico
Klasse-indeling Pathogenen GGO’s Inperkings-niveau Klasse 1 Niet pathogeen Geen of verwaarloosbaar risico L1 (enkel voor GGO’s) Klasse 2 milde pathogenen Laag risico L2 Klasse 3 Matige pathogenen Matig risico L3 Klasse 4 Zware pathogenen Hoog risico L4
 Klasse 2. milde pathogenen. Laag risico. L2. Klasse 3. Matige pathogenen. Matig risico. L3. Klasse 4. Zware pathogenen. Hoog risico. L4.")
9
Inperkingsniveau’s Omschrijving van: Fysieke inrichtingseisen
werkprocedures

10
Inperking Is de gecombineerde toepassing van: Biologische inperking
Fysische inperking Toepassing van veilige werkprocedures PBM’s

11
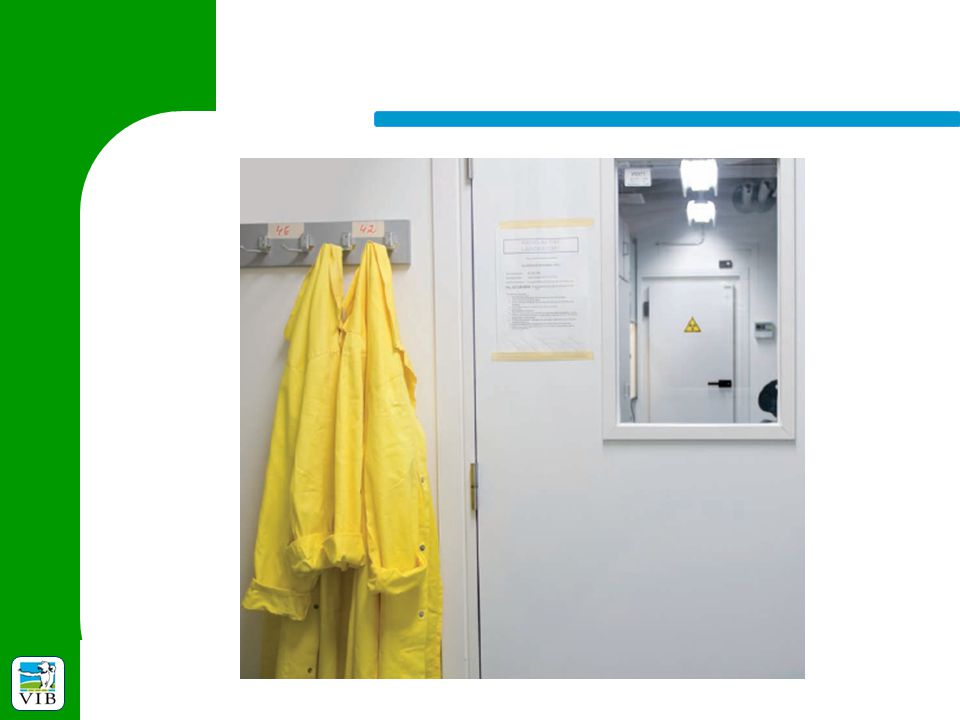
Fysieke inperking L1 Permanente structuur
Gladde, makkelijk te ontsmetten oppervlakken Wasbak kapstok

12
Fysieke inperking L2, additioneel: Deuren kunnen gesloten worden
Waarschuwings- en informatie signalen Gerestricteerde toegang (klasse II veiligheids-kabinet)
")
13
Fysieke inperking L3 additioneel Sas Onderdruk Hepa filter
Fumigeerbaar Klasse II veiligheidskabinet Electronische back-up Brandalarm ……

14
De risicoanalyse (GGO’s)
Hoe begin je eraan? ………

15
Stap 1 Hazard identificatie <-> organismen
Taxonomie Schadelijke eigenschappen Verspreiding GGO: gastheer, donor, insert Eindpunt: risicogroep-indeling

16
Stap 2 Analyse van de activiteit <-> kritische punten
Type activiteit Schaal vd activiteit (volume / concentratie) Bijzondere handelingen Transport Afval In noodgevallen Eindpunt: modifyers van risiconiveau
 Bijzondere handelingen. Transport. Afval. In noodgevallen. Eindpunt: modifyers van risiconiveau.")
17
Stap 3 Inperkings / preventiemaatregelen
Primaire inperking Secundaire inperking Procedures Toegang Training Gezondheid Eindpunt: finale risiconiveau-indeling

18
Veilige microbiologische technieken!!
Werkprocedures Veilige microbiologische technieken!! (VMT) Voor alle werk met micro-organismen en cellen
 Voor alle werk met micro-organismen en cellen.")
19
VMT

20
Aerosolproducerende handelingen

21
Labjas Routine Normal labcoat Dedicated labcoat

23
PBMs

24
Handschoenen Kunnen om twee redenen gedragen worden:
Om jezelf te beschermen Om je experiment te beschermen Draag ze enkel als het echt moet Versvers ze regelmatig Blijf af van deurknoppen, etc.

25
Handschoenen veilig uitdoen

26
Unwanted skin exposure ?

27
De veiligheidsbril Wanneer chemische stoffen een gevaar kunnen betekenen voor het oog Histologie Geconcentreerde zuren / basen Etc.

28
Klasse II bioveiligheidscabinet
Bescherming van: medewerker experiment leefmilieu -> Correct gebruik!

29
Klasse II veiligheidskabinet
Biohazard laminar flow class II HEPA filtered air Underpressure in working area Inflow creates air barrier Containment, sterility working area: largely dependent on this “air curtain” This is not a magical box !

30
Houd het luchtgordijn intact!
Elk object = verstoring Enkel objecten die je echt nodig hebt Open rekken, niets op de roosters Elke manipulatie = verstoring Beweeg voorzichtig Vermijd telkens van binnen naar buiten te bewegen Verstoring van buiten Passerende collega’s Plaatsing onder ventilatoren

31
SAFE USE?

32
Controleer altijd Bij recente kabinetten kan de luchtsnelheid aangepast worden van: - Downflow - Luchtgordijn Alarm ? Dat gaat jou aan !

33
Front scherm Niet genoeg ruimte voor openen en manipuleren van kooien
Dit kabinet niet geschikt voor dit werk

34
Een alternatief voor in animalaria

35
Safe use of a class II cabinet
Prepare an experiment thoroughly and collect all necessary materials before beginning work. Allow the cabinet to run for a minimum of 15 minutes before beginning work. Check the indicators on the cabinet to see that it is properly functioning and safe to use. Decontaminate the work surface and air intake grills with a proper disinfectant (for instance 70% ethanol or 1% Virkon). Only place materials and equipment in the cabinet that is required for immediate work. Do not put any paperwork in the cabinet. Only use ‘open’ trays and holders which do not block the airflow. Never place objects over the front or rear air intake grills. Remember to always work from a ‘clean’ to a ‘dirty’ side. On the ‘dirty’ side you should place a small container or plastic bag for contaminated items such as pipette tips.
. Only place materials and equipment in the cabinet that is required for immediate work. Do not put any paperwork in the cabinet. Only use ‘open’ trays and holders which do not block the airflow. Never place objects over the front or rear air intake grills. Remember to always work from a ‘clean’ to a ‘dirty’ side. On the ‘dirty’ side you should place a small container or plastic bag for contaminated items such as pipette tips.")
36
…Continued Move your arms slowly in a manner that will minimize the disruption of the airflow. Minimize activities that can disturb the air barrier in the cabinet such as the opening of nearby doors, or personnel passing by close to the cabinet. Perform all work well inside the cabinet, and not on the outer edge. Do not use a Bunsen burner or an equivalent electronic heating device, since this may create a strong turbulence in the airflow. Use disposable inoculation needles instead. When your work is finished, decontaminate all materials on the outside before removing them from the cabinet. Waste should be removed from the cabinet in a closed container or a closed plastic bag, which is decontaminated on the outside before removing them from the cabinet. Decontaminate the work surface and the air intake grills. Allow the cabinet to run for another 10 minutes before turning it off.

37
Bunsen brander in the cabinet ?
Smaller, better controlled flame Heated glass beads But: any heat source = disruption of air currents No flame at all !

38
Use disposables instead

39
Hazardous waste?!

40
Houdt een logboek bij Date Time Organism Name
Sign after decontamination

41
Correct gebruik

42
Laat je niet foppen!

43
Zie je het verschil?

44
En nog een!

45
Petrischalen veilig openen en sluiten

46
Opening safely Open the petri dishes and put the lids in front, resting with one side on the petri plate

47
Closing safely Close the lids by simply pushing the lid over the petri dish with your fingers In this way you avoid having to go over the open plates with your fingers / hands !

48
Now you have to go over the opened petri dish!
How not to open it Now you have to go over the opened petri dish!

49
How not to close it And when you close it again you have to go over the open petri dish risking contamination of yourself or the contents of the dish

50
Werken met ‘sharps’ Scalpels Injectienaalden NOOIT herkappen!

51
SPILLS End any further possible leaking
If an ‘airborne’ human pathogen is involved: move yourself and your colleagues away from the lab, allowing aerosols to descend, and only enter again after 30 minutes, equipped with the necessary protective gear to perform the disinfection procedure. Provide yourself with the appropriate personal protective equipment. Cover with tissues drenched in disinfectant. Always work from the outside toward the inside. Disinfect twice and take into account the time the disinfectant needs to take effect. Collect all the waste in an autoclave bag or in a container for hazardous medical waste. In case of sizeable leaks: try to dike in or enclose the leak Go and warn the person in charge of biosafety

52
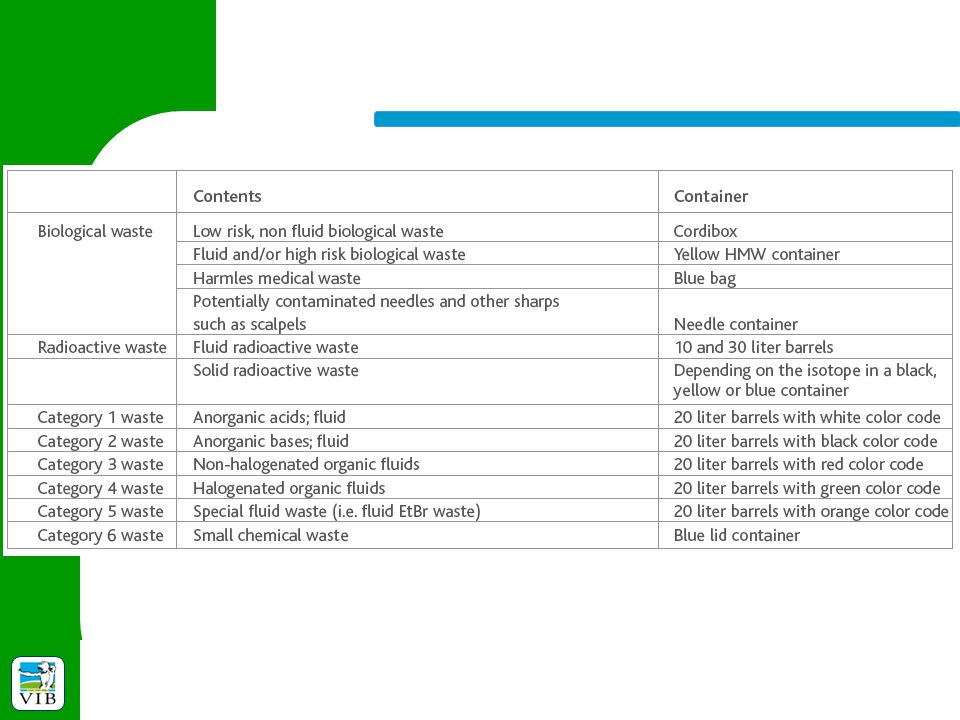
Afval

53
Wat is biohazard afval? Levende GGOs en/of pathogenen
Materialen die in contact zijn geweest met of levende GGOs en/of pathogenen kunnen bevatten Ofwel (gevalideerde) inactivatie in huis Ofwel afvoer als risicohoudend medisch waste (gele tonnen)
 inactivatie in huis. Ofwel afvoer als risicohoudend medisch waste (gele tonnen)")
54
Biohazard afval Cultuur vloeistoffen Cultuur platen Flessen
Pipetten, pipet tips handschoenen Sharps Etc Maar alleen wanneer ze levende GGO’s en of pathogenen kunnen bevatten

55
Afvalhouders in een L1 GGO lab
Industrieel rest afval Risicohoudend medisch afval (chemisch gecontamineerd afval) Papier
 Papier.")
56
Waste bins in a non-GMO lab
Industrial residual waste (chemically contaminated waste) Paper
 Paper.")
58
Inactivation Chemically Autoclaving
Disinfectant with correct working spectrum Correct concentration and waiting period Refresh solutions as prescribed Validate Autoclaving Decontamination autoclave Log and validate

59
Decontamination

60
De 4 gouden regels voor schoonmaak en desinfectie

61
From difficult to easy to reach
Rule 1 From difficult to easy to reach first last

62
Rule 2 From top to bottom Otherwise you contaminate the bottom areas while going up (see the staircase analogy)
 .")
63
As to avoid contaminating areas that are clean
Rule 3 From clean to dirty As to avoid contaminating areas that are clean

64
Rule 4 From coarse to fine Step 1: Remove dirt Step 2: Clean
70% EtOH Step 1: Remove dirt Step 2: Clean Step 3: Decontaminate First do your gross cleaning, removing most of the dirt, then fine clean, and disinfect the latest

65
Belangrijke contacten

66
MORE INFO ON (BIO)SAFETY
Booklets:

Verwante presentaties


![Deltion College Engels B1 Gesprekken voeren [Edu/005] thema: applying for a job can-do : kan een eenvoudig sollicitatiegesprek voeren © Anne Beeker Alle.](/9/2250293/big_thumb.jpg "Deltion College Engels B1 Gesprekken voeren [Edu/005] thema: applying for a job can-do : kan een eenvoudig sollicitatiegesprek voeren © Anne Beeker Alle.>")
![Deltion College Engels B1 En Spreken/Presentaties [Edu/007] Thema: Soap(s) can-do : kan met enig detail verslag doen van ervaringen, in dit geval, rapporteren.](/9/2250307/big_thumb.jpg "Deltion College Engels B1 En Spreken/Presentaties [Edu/007] Thema: Soap(s) can-do : kan met enig detail verslag doen van ervaringen, in dit geval, rapporteren.>")
![Deltion College Engels En Projectopdracht [Edu/001] thema: research without borders can-do/gesprekken voeren : 1. kan eenvoudige feitelijke informatie.](/9/2250308/big_thumb.jpg "Deltion College Engels En Projectopdracht [Edu/001] thema: research without borders can-do/gesprekken voeren : 1. kan eenvoudige feitelijke informatie.>")
![Deltion College Engels C1 Spreken/Presentaties [Edu/006] thema ‘I hope to convince you of… ‘ can-do : kan een standpunt uiteenzetten voor een publiek van.](/9/2250312/big_thumb.jpg "Deltion College Engels C1 Spreken/Presentaties [Edu/006] thema ‘I hope to convince you of… ‘ can-do : kan een standpunt uiteenzetten voor een publiek van.>")
![Deltion College Engels B1 Schrijven [Edu/004]/ subvaardigheid lezen thema: reporting a theft can-do : kan formulieren waarin meer informatie gevraagd wordt,](/9/2250314/big_thumb.jpg "Deltion College Engels B1 Schrijven [Edu/004]/ subvaardigheid lezen thema: reporting a theft can-do : kan formulieren waarin meer informatie gevraagd wordt,>")
![Deltion College Engels C1 Gesprekken voeren [Edu/006] thema: ‘I was wondering what you think of…’ can-do : kan deelnemen aan de conversatie bij zeer formele.](/9/2250317/big_thumb.jpg "Deltion College Engels C1 Gesprekken voeren [Edu/006] thema: ‘I was wondering what you think of…’ can-do : kan deelnemen aan de conversatie bij zeer formele.>")

![Deltion College Engels B2 Spreken/presentaties/subvaardigheid lezen [Edu/003] thema: Holland – coffee shops and euthanasia? can-do : kan een duidelijk.](/10/2833741/big_thumb.jpg "Deltion College Engels B2 Spreken/presentaties/subvaardigheid lezen [Edu/003] thema: Holland – coffee shops and euthanasia? can-do : kan een duidelijk.>")
![Deltion College Engels B1 Lezen [no. 001] can-do : 2 products compared.](/10/2836380/big_thumb.jpg "Deltion College Engels B1 Lezen [no. 001] can-do : 2 products compared.>")
![Deltion College Engels B1 Gesprekken voeren [Edu/008] theme: ‘I have to arrest you, you’ve stolen my heart’ … can-do : kan een eenvoudig face-to-face gesprek.](/10/2836745/big_thumb.jpg "Deltion College Engels B1 Gesprekken voeren [Edu/008] theme: ‘I have to arrest you, you’ve stolen my heart’ … can-do : kan een eenvoudig face-to-face gesprek.>")
![Deltion College Engels B1 Schrijven [Edu/003] thema: what have I done wrong…? can-do : kan e-mails/ brieven schrijven over persoonlijke zaken © Anne Beeker.](/10/2837503/big_thumb.jpg "Deltion College Engels B1 Schrijven [Edu/003] thema: what have I done wrong…? can-do : kan e-mails/ brieven schrijven over persoonlijke zaken © Anne Beeker.>")

![Deltion College Engels B1 Gesprekken voeren [Edu/006] thema: Look, it says ‘No smoking’… can-do : kan minder routinematige zaken regelen © Anne Beeker.](/10/2924527/big_thumb.jpg "Deltion College Engels B1 Gesprekken voeren [Edu/006] thema: Look, it says ‘No smoking’… can-do : kan minder routinematige zaken regelen © Anne Beeker.>")
![Deltion College Engels B2 Schrijven [Edu/006] thema: Euromail can-do : kan in persoonlijke e-mails nieuws en standpunten van een ander becommentariëren.](/10/2930340/big_thumb.jpg "Deltion College Engels B2 Schrijven [Edu/006] thema: Euromail can-do : kan in persoonlijke e-mails nieuws en standpunten van een ander becommentariëren.>")
![Deltion College Engels C1 Spreken/Presentaties [Edu/004] thema ‘Today I will talk to you about… ‘ can-do : kan duidelijke, gedetailleerde beschrijving.](/10/2949214/big_thumb.jpg "Deltion College Engels C1 Spreken/Presentaties [Edu/004] thema ‘Today I will talk to you about… ‘ can-do : kan duidelijke, gedetailleerde beschrijving.>")
![Deltion College Engels B2 Spreken/presentaties/subvaardigheid lezen [Edu/002] thema: how stuff works can-do : kan de werking van een produkt uitleggen.](/10/2983667/big_thumb.jpg "Deltion College Engels B2 Spreken/presentaties/subvaardigheid lezen [Edu/002] thema: how stuff works can-do : kan de werking van een produkt uitleggen.>")
![Deltion College Engels A2 Lezen [Edu/001] thema: What about smoking in this B&B? can-do : kan specifieke informatie vinden en begrijpen in eenvoudig, alledaags.](/10/2989858/big_thumb.jpg "Deltion College Engels A2 Lezen [Edu/001] thema: What about smoking in this B&B? can-do : kan specifieke informatie vinden en begrijpen in eenvoudig, alledaags.>")
![Deltion College Engels C1 Spreken [Edu/002] thema: A book that deserves to be read can-do : kan duidelijke, gedetailleerde samenvatting geven van een gelezen.](/11/3027448/big_thumb.jpg "Deltion College Engels C1 Spreken [Edu/002] thema: A book that deserves to be read can-do : kan duidelijke, gedetailleerde samenvatting geven van een gelezen.>")